
Instructions on how to use the Module Template
This is a simple guide on how to use the template.
- Navigate to the page on any arts site, and create a new "Module Template" page:
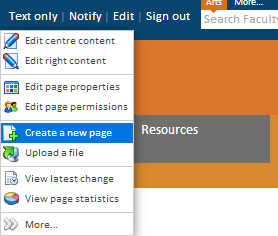
- Hover over the "edit" link in the upper right of the page, and click on "create new page"
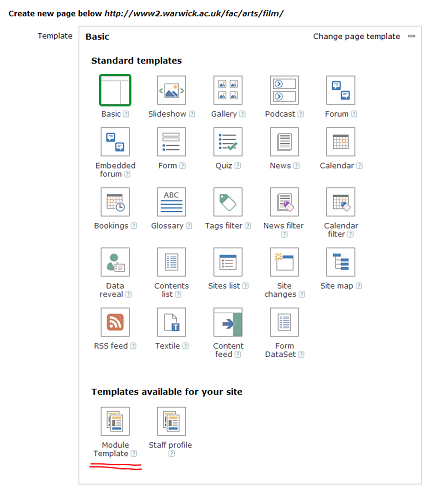
- Under "template" (this will usually say "Blank") open the selection and navigate to the "Module Template" option)
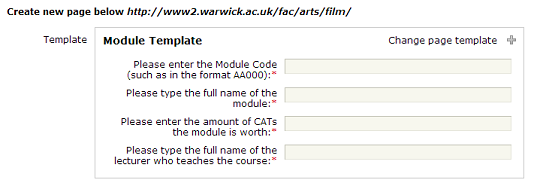
- You will then be required to enter some information before you can publish the page: the module code; module name; the amount of credits the module is worth; and the lecturer's name.
- Once all the information has been filled in, click "create a new page" to publish the page.
- Hover over the "edit" link in the upper right of the page, and click on "create new page"
- Once published, you are free to edit the description, reading list, and assessment methods as you see fit. Add books, articles, and anything else necessary.
- In the right hand side, there are a few things you should do:
- You should replace the placeholder picture with a picture of the lecturer. If one is not available, or the lecturer does not wish to have one, I recommend you delete the picture entirely.
- You should change the URL of the lecturer's profile page (it is recommended that this links to their staff profile page on their departmental site).
- You should change the links and link text for the 'related modules' and 'required modules' section. You may add or delete these links as necessary (for instance, if you have several similar modules but no required modules, then delete the 'required modules' section altogether and add more to the 'related modules').
- Once the template is created, it may be edited, amended, or updated just like any ordinary Sitebuilder page.
And there you go!