
Who can see this entry?
 Who can see this entry?
You can choose who is able to view each entry. If you select any option other than 'Anyone', a padlock icon like this:  will appear next to the title of your entry to show that viewing access is restricted. If anyone who does not have permission to view the entry looks at your blog, they will not be able to see the entry.
To select a level of privacy from your entry:
- Click on the drop down privacy list under 'Who can see this entry?' next to the icon that looks like this:
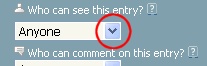
- Select the level of privacy that you would like for the entry.
- Write the rest of your entry.
- Click the 'Publish now' button.
If you have restricted who can view the entry, a padlock icon will appear next to the title.
There are seven levels of privacy: 'Anyone', 'Staf', 'Students', 'Staff/Students', 'Friends', 'Contributors' and 'Just me'. In addition to these, you can make your own custom privacy level by combining any of the following groups: 'Administrators', 'Anyone', 'Authors', 'Friends', 'Moderators', 'Staff' and 'Students'. To do this:
- Click on the drop down privacy list and select 'Custom...'.
- In the pop-up window, tick the boxes of the groups you want to include in your custom privacy level. It is fine to have just one box ticked or to have a number of boxes ticked.
- Click 'Done'.
Example: If you were writing an entry about an essay plan that you wanted to show your tutor, but did not want other students to see, you could choose the privacy level 'Staff'.
Take me to related FAQs: