
Uploading external recordings to eStream
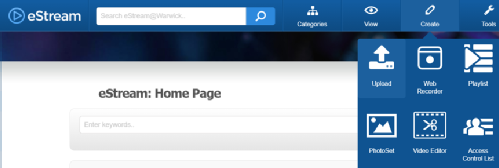
To upload a recording to eStream, hover over the Create button on the top ribbon and then click on Upload from the drop down menu.
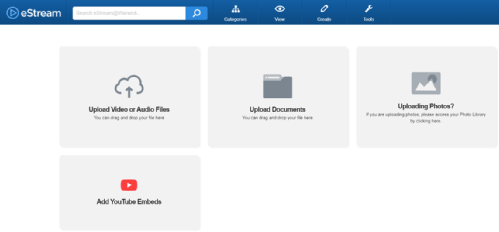
You'll then be presented with a number of upload options. Click on the Upload Video or Audio Files button.
In the Add Media Options dialogue box that appears, click the Use filename for title checkbox to remove the tick. This will allow you to add your own title to the recording in the Title field. It is good practice to complete the Description field with a brief summary of the recording. You can also add keywords to the Keywords box which will help users (and you) to find your recording.

The Options dropdown menu has three Publishing Policy options:
- Standard (No network / IP restrictions)
- Internal Only (Restricted to Warwick network / IP range)
- Student content (no network / IP restrictions)
You should use option 1 if you want to generate an embed code to add the recording to Moodle or Mahara or to embed the recording in a public-facing web page. Use option 2 if you want to make the recording only available to devices on the Warwick network. Bear in mind that this will preclude users from accessing the recording off campus. Option 2 should therefore be used with caution. Option 3 should only be used if you want users to access the recording directly from eStream (i.e. if you don't want to embed it elsewhere). Option 1 is the default option and this gives the most flexibility access wise.
Ignore the Select to make the content private checkbox as this will make the recording only accessible and searchable to/by you.
Click on the blue Select Categories link. Expand the Faculty of Social Sciences menu by clicking on the + icon next to it and then tick the checkbox next to Centre for Teacher Education.
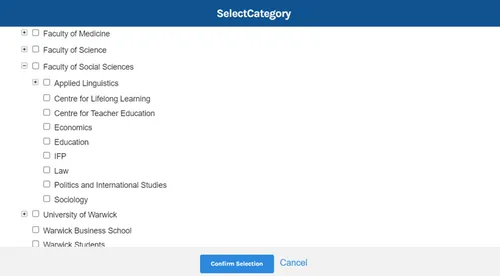
If you want other students to see this recording, you should also tick the Warwick Students category at the bottom of the list. Then click on the Confirm Selection button.
If the recording is a copy of broadcasted content (e.g. a recording from the television) that you are providing for non-commercial, educational purposes, you will need to mark it as such. Click the ERA Content checkbox to do this. Further information about the ERA licence is available here:
https://estream.warwick.ac.uk/Help/ERALicence.aspx
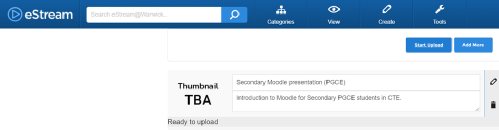
Ignore the Copy only field in the dialogue box (this is only applicable if you are uploading content that is encoded with H264 and AAC Audio) and then click on the Confirm button. You will be presented with a screen similar to the one below where you can either Start [the] Upload or Add More recordings by clicking the relevant button. You can also edit the title of the recording you have just added or delete it using the pencil or dustbin icons next to its title (providing you haven't already clicked the Start Upload button).
If your recording is large or you have several that you are uploading at the same time, this process can take a while. The upload limit for an individual recording on eStream is 6GB (so quite large). Once the upload is complete you will get an email telling you that the recording is available.