
Creating text alternatives for video and audio resources
Any pre-recorded video or audio file, recorded after 23rd September 2020, must have an alternative that presents equivalent information. Acceptable alternatives include a PowerPoint presentation with teacher notes, a text summary or a transcript. A transcript is a document that includes correctly sequenced text descriptions of time-based visual and auditory information.
A video script or transcript automatically generated by Echo360 or Microsoft Teams meets this definition (although caveats about the accuracy of these automatically generated transcripts should be provided).
Whilst captions (subtitles) are not a legal requirement, if you have the time to do this then you should endeavour to provide them. Captions are synchronised visual and/or text alternatives for both speech and non-speech audio information needed to understand the media content.
PowerPoint recordings
If you have recorded a PowerPoint presentation using teacher notes, you can provide a copy of the presentation with the notes alongside the .mp4 recording. Alternatively if the video has been uploaded into Echo360, a transcript will automatically be generated and captions can be turned on from within Echo360. When the link to the recording is subsequently shared, the transcript and captions are available within the player interface.
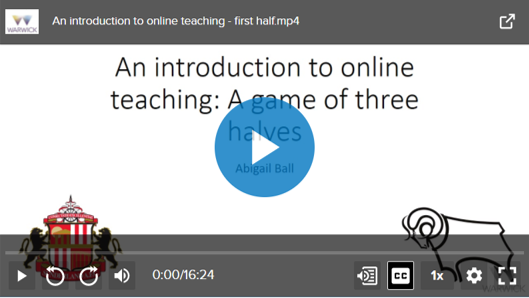
To switch on the transcript, click on the Transcript button (it looks like a page of text with a speaker next to it) at the bottom right of the screen. To switch on the captions click on the CC button at the bottom right of the screen.
eStream recordings
eSteam does not provide an automatic transcription or captioning service. You can upload an alternative text version of the presentation using the Related Media button or you can use the Manage Subtitles button to manually type your subtitles into the eStream interface or upload an .sst file.
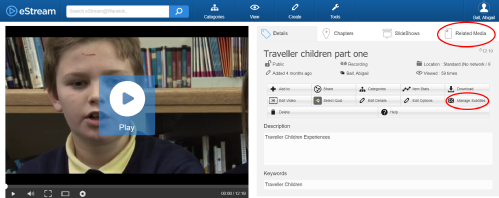
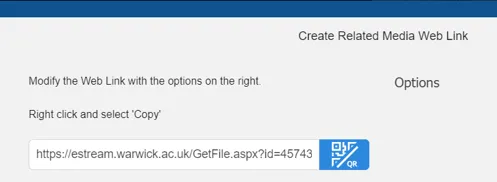
The easiest option is to upload and share Related Media alongside your video. Click on the Related Media button, then click on the Upload File button.

Click on the Select Files button. An explorer window will open where you can choose your files.
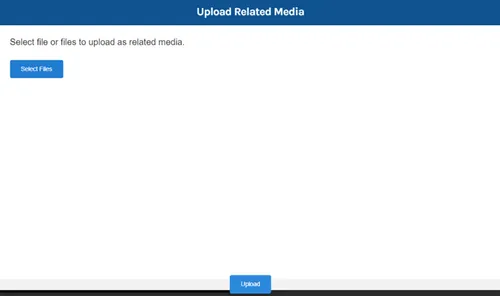
eStream does not really care what type of file you upload, but ideally it should be a .doc file or a .txt file. Click the Upload button to complete the process. Once the files have uploaded, a pop up window will appear asking if you want to add any more items; click Cancel at this point.
Now you need to share the file(s). Click on the Share button (indicated by the red arrow).
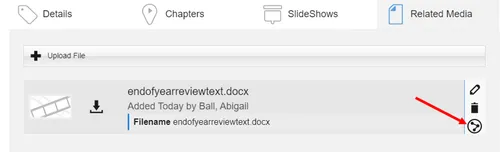
Copy and paste the web link alongside the video recording. Alternatively you can add a QR code alongside the recording. Click on the X at the top right of the dialogue box to close it.
Microsoft Stream recordings
Microsoft Stream can generate an automatic transcript and captions from .mp4 files or .wmv files providing they have been recorded in one of the following languages: English, Chinese, French, German, Italian, Japanese, Portuguese or Spanish. Automatic captions/transcripts take a considerable amount of time to generate. They can sometimes take up to twice the length of the recording to appear.
NB: If you autogenerate a transcript or caption file you cannot also upload a transcript or caption file (and vice versa).
Further information about generating transcripts and captions in available here:
Echo360 recordings
Echo360 will generate a transcript for any .mp4 recordings within your library, whether you have imported them or created them within Echo360 itself. These will take a minimum of half an hour to process and become available. Be aware that very large files can take considerably longer than this.
If you edit your video (such as cropping the ends or removing sections) you need to allow time for the new video to fully process and for a new transcript to be generated before you start editing the transcript. Otherwise the transcript will not align correctly with the new version of the video and it will not make sense.
Click on the blue button with the three white dots on the relevant recording.
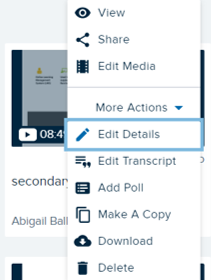
Click on More Actions and then Edit Transcript from the drop down menu.
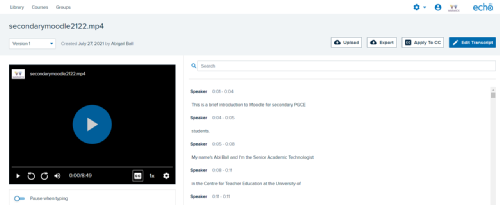
Click on the Edit Transcript button at the top right of the screen.
If you then click the play button on the video, the relevant section of the transcript will be highlighted in blue allowing you to check for accuracy. The video should pause automatically once you start typing as long as the Pause when typing slider at the bottom left is set in the on position.
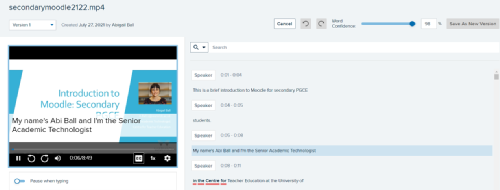
Once you have made your edits, simply click on the Save As New Version button and the updated transcript will be displayed alongside the video. At this point you should also click the Apply To CC button to display closed captions on your recording.
When the link to the recording is subsequently shared, the transcript and captions are available within the player interface.
To switch on the transcript, click on the Transcript button (it looks like a page of text with a speaker next to it) at the bottom right of the screen. To switch on the captions click on the CC button at the bottom right of the screen.
Blackboard Collaborate recordings
Once staff have made a recording using Blackboard Collaborate they should email A.Ball.1@warwick.ac.uk to tell her that they have made a recording. The recording will then be uploaded into Echo360 to generate an automatic transcript and captions will be applied. Staff will then be sent a link to their recording which they can then add to their Moodle space or website.
If you have a recording that you have created outside of these Warwick supported options, then you can use Otter.ai to generate a text version of your audio. This can then be provided alongside your recording for anyone to access.
The Difference Engine
This is an app developed by Talking Birds to support the captioning of small scale, live performances. We are not endorsing its use but if you are interested, this video will tell you more.
There is also more information on the Difference Engine website.