
Lecture Capture
To record lectures we use the Echo360 system supplied by the University AV Services. They provide lots of useful information on this service, please see the link below:
http://www2.warwick.ac.uk/services/its/servicessupport/av/lecture_captureLink opens in a new window
- If you are teaching in a room outside of WBS please contact AV Services via the link above
- If you will be teaching in a room inside of WBS please see the information below.
You need to wear and un-mute a radio microphone to record the audio
Only the Centre projector image is captured.
Lecture Capture
This uses a dedicated hardware box in the room that is scheduled to record lectures. By default it will capture anything projected onto the centre screen although it is possible for it to be configured to capture more than one input (e.g. PowerPoint on the centre screen and the Visualiser output from the side screens). Although possible we will not capture video of the lecturer unless specifically requested. Using this system the capture is scheduled so there is one less thing for you to worry about. The downside is that if the lecture capture is scheduled for 4pm to 6pm it will end exactly at that time, even if your actual lecture overruns slightly.
This service is available in all WBS lecture theatres, and some seminar rooms:
| 0.004 - WBS Scarman Road * | 0.006 - WBS Scarman Road * | 0.009 - WBS Scarman Road * | 0.011 - WBS Scarman Road |
| 0.013 - WBS Scarman Road * | 0.102 - PGIT - WBS Scarman Road | 0.103 - PGIT - WBS Scarman Road | 0.301 - Executive Teaching Centre * |
| 1.003 - WBS Scarman Road | 1.005 - WBS Scarman Road | 1.006 - WBS Scarman Road | 1.007 - WBS Scarman Road |
| 1.009 - WBS Scarman Road * | 1.015 - WBS Scarman Road | 1.301 - Executive Teaching Centre * | 2.003 - WBS Scarman Road |
| 2.004 - WBS Scarman Road * | 2.005 - WBS Scarman Road | 2.006 - WBS Scarman Road | 2.007 - WBS Scarman Road |
| 3.006 - WBS Scarman Road * | M1 - WBS Teaching Centre * | M2 - WBS Teaching Centre * | |
| East theatre - Shard * | South theatre - Shard * | S9-S12 - Shard | L13 Theatre - Shard * |
* Denotes room with camera - if you wish for this to be recorded you need to add this to your lecture capture booking.
Sounds good, how can I get my lecture captured?
There have been some changes to the lecture recording process for 2017-18. This guidance explains how lecture recordings will be shared with students (including how to manage and edit recordings). The first two steps in the process are unchanged:
Step 1 - Consent
You must complete the lecturer consent formLink opens in a new window . This need only be completed once per person but no recordings can be shared without a completed form.
Step 2 - Request lecture recording
If you wish to organise lecture capture for your module, please send an email to: wbslecturecapture@wbs.ac.uk
You will need to provide information about the dates, times and rooms for each lecture, as well as details of the presenters (if there is more than one person teaching on the module).
Requests for recordings should be made at least 72 hours in advance of the lecture. We cannot guarantee that any requests made later than this will be processed in time.
Step 3 - Sharing recordings with students
You will not receive an email telling you that your recording has been completed.
Recordings will be accessible immediately via your my.wbs module, but will not be available to students until you release them.
Releasing recordings
NB: You can choose when to make recordings available to students. By default, when you make recordings available by the method show below, ALL recordings on the module will be visible to students as they are completed. You can, however, ‘hide’ individual recordings – see the guidance under ‘Editing Recordings’, below.
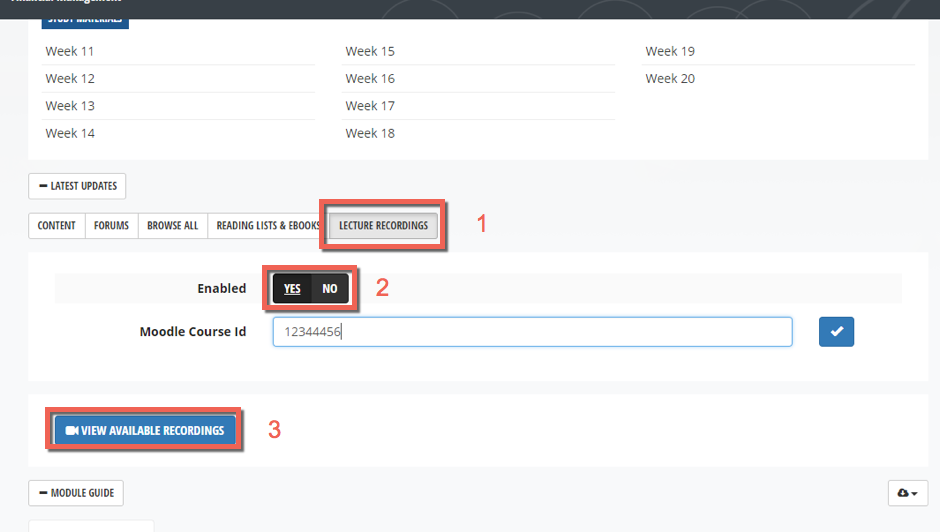
(1) At the bottom of the module page, you will see a series of tabs. One of these is ‘lecture recordings’
(2) By default these will not be enabled, so students will not be able to see them. Click on ‘yes’ to enable students to view lectures.
(3) You can check which recordings are complete by clicking on ‘view available recordings’
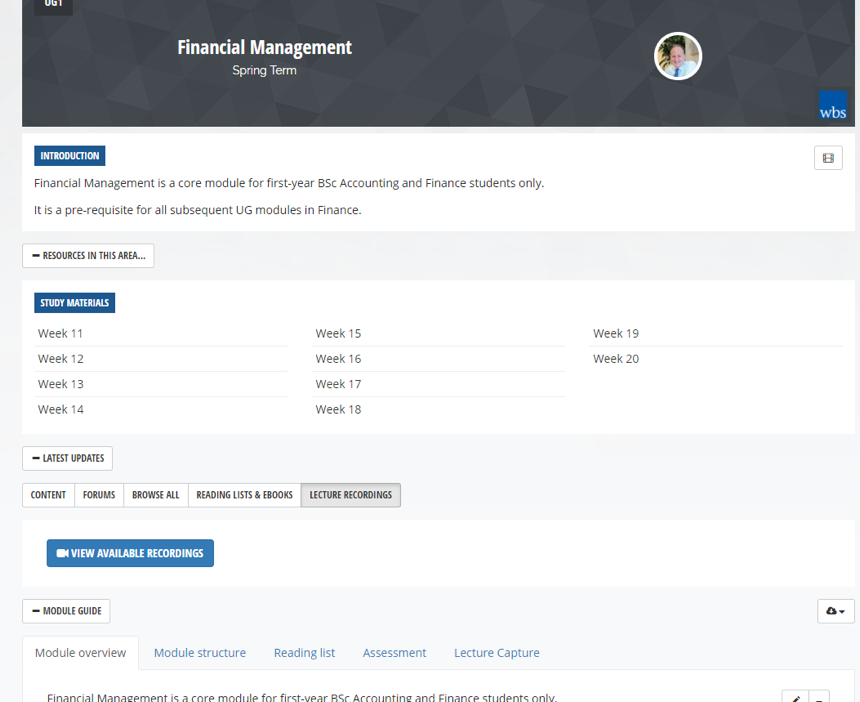
This is the student view of the lecture recording tab:
Step 4 – Managing your recordings
To access available recordings for your module, click on the link (3 in the image above). You will be able to access recordings for your module even when this has not been enabled for students.
This will take you to a Moodle space where the videos are housed. You will be prompted to sign in to Moodle (you can use either your WBS or your IT Services credentials).
(1) First click on the lecture capture block:
This will take you to a list of your recordings.
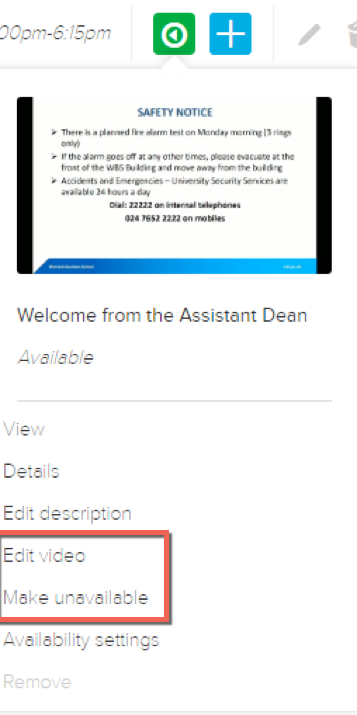
The green button to the right of the video title allows you to:
Make individual recordings unavailable
You may wish to do this if you wish to delay the release of some recordings but not others, or if you wish to edit a video before students watch it. Just click on the link at (1), in the diagram below. The green button will turn grey. When you wish to make the video available again, click on ‘Make video available’ (in the same drop down menu), and the button will turn green again.
Edit Recordings
First, you can make the video unavailable while you make any edits (see above) if you wish. Click on the Edit video link. This will take you to the video editing screen. When you have made your edits, click ‘Save’ to return to the main video dashboard and make the finished video available to students.
If you have any queries or concerns please contact help@wbs.ac.uk for support.
Having problems?
If you have any problems with the Echo360 systems please see our troubleshooting page to see whether this is an issue about which we are already aware.