
Part 2: The process
The production timeline varies depending on the animation style and duration; for simple motion graphic animations the minimum is around two weeks. A two-minute 2D digital animation with limited characters and elements might take around three months. Projects that are more complex will take even longer.
One stage you won’t want to take any short cuts on is planning.
In this section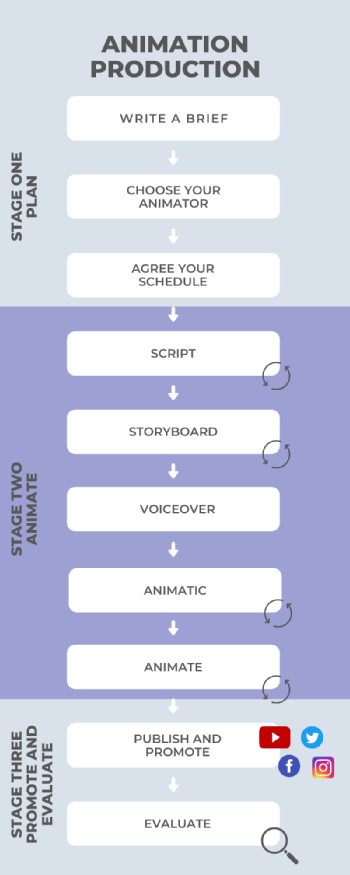
- Animation timeline infographic (view in a new window)
- Stage one - plan
- Stage two - animate
- Stage three - promote and evaluate
Step one – Plan
The Brief
The brief is an important document in which to scope out and articulate the key purpose and scale of the animation. It also becomes invaluable as you progress through the production phases, enabling you to refer back to and check if any decisions made are in service to your goals and key messages.
The brief should include an accessible description of your research, how the animation will be used, your target audience(s) and your key messages. You can use this worksheet to produce a brief for your animation project.
Finding your animator
Send your brief to at least two different potential animators [see also further information on the University’s purchasing guidelines and list of approved suppliers]. Look for animators whose style and approach matches your aspirations - you can ask colleagues for recommendations or contact digitalstudio@warwick.ac.uk for advice. You can also try freelance ‘marketplaces’ (like Bark or Fiverr) although you may need to justify why you're not using an approved supplier for the work to finance. Animators either work alone or as part of a team or studio, and there are agencies who will take your brief and put forward recommended animators to suit. There are also specialist companies that produce ‘video abstracts’ for research.
Making changes, or ‘rounds of amends’ as your proceed through the production process are not always included in initial quotes, so be sure to query this.
In addition to quotes, you may want to ask your potential animators for a proposal in response to your brief with their interpretation of it. This provides an additional opportunity to check that everyone is on the same page with the aims and services to be provided. Considerations could include:
- you like previous work they’ve done
- positive reviews and testimonials
- the animator(s) asking interesting questions and clearly understand the aims
- the work can be done within budget and timescales.
A good animation has a great narrative, high quality illustrations and design, smooth motion, and appropriate sound design. One benefit of working with studios is that they often have a number of staff that cover the diverse range of skills and expertise required.
Schedule
Now that you have chosen your animator, you should agree the schedule that includes when the various milestones will be met and draft/final outputs will be received and the dates when feedback or approval are expected. It’s a good idea to make sure anyone who needs to provide feedback or approval is available at these points to keep things moving forward smoothly.
Stage 2 - Animate
Now the fun begins. It’s wise to include at least one opportunity to provide feedback and make changes at each key development stage (‘rounds of amends’). You may also consider involving individuals that are directly affected by the topics covered in the animation (for example, the Coping with Hearing Voices’ animation was created with a lived experience group) or to test the content with members of your target audience (for example, My Genome Sequence was tested for understanding with school students).
Script
The script is the backbone of the animation and bear in mind that 300 words is approximately two minutes of animation. Given that you have limited words to say what you want to say, it makes sense to hone the explanations at this point.
You might find the Storytelling for Research resource helpful and there are also plenty of online guides you can access for free. For example this video by Greg Foot on "How to explain a science idea clearly" contains lots of helpful advice that's applicable regardless of your discipline.
Storyboard
The storyboard is the first time that the animators provide the visual ideas for the animation. It is a bit like a comic strip with simple line drawings and directions to show how the narrative, action and transitions will unfold. The storyboard is an opportunity to check the structure, flow and visual elements are clear. At this point you might notice that script changes are needed and it is important to ensure these are ironed out before the voiceover recording take place.
Once the storyboard is established and agreed, the voiceover is recorded. Your animator can suggest where to find professional voiceover actors; or you or a colleague might consider doing this– if so, do a practice piece to ensure your/ your colleague’s voice will work well with the animation; and then practice reading the script until it becomes very familiar and feels and sounds natural.
The final storyboard is usually provided as an animatic – essentially, a slide show of the storyboard synchronised to the voiceover. This gives you an idea of the pacing of the animation, as well helping to sync the voiceover to the action.
You might be struggling to visualise what the final animation will look like, but ensure you are completely satisfied before moving onto the animate stage, as this is where the big costs can come in if changes are needed after this point.
Animate
Once all visual ideas, structure and other key elements are approved, the storyboard gets transformed into an animation. Depending on the approach used, this will likely take the most time. Once the first draft of the animation is signed-off, the next stage is typically sound design – including the music and any sound effects, and then the finishing touches like credits and logos.
Stage 3 – promote and evaluate
Promote
Well done – you’ve created an animation! But the job is not yet done as it is time to make sure your chosen audience can find and access your animation.
If sharing online, the animation will need to be uploaded to a video hosting platform, e.g., YouTube. [Note: Warwick Institute of Engagement have a YouTube account and are happy to host videos for you if needed]. It needs to have a snappy title and eye-catching ‘thumbnail’ i.e. the title, description and tags need to use words that people are searching for. To make sure it’s accessible to as many people as possible, check that the auto-generated subtitles are accurate and published.
Next up is to make a plan to put your animation in front of the right people; some options below:
- Identify the communications channels on which you can share the animation
- Ask partner organisations, colleague and individuals/groups already connected with the target audience to share it.
- Use it at events; post it on social media; embed it on web pages, news stories or press releases include it in broadcasts.
Explore using some funds on boosting posts on social media to ensure more people will see your animation. Make sure you let the Institute of Engagement team know about your animation as they may be able to help promote it. Some groups recommend spending the equivalent of a third of the production budget on promotion.
You can extend engagement with your animation by:
- creating supporting resources – like lesson plans for school pupils or teachers (and add these to e.g., the Times Education Supplement resource database)
- create supporting web pages with more information or activities, puzzles or games or links to the profiles of who is involved in the research.
- do extra social media activities like live Q&As or sharing ‘behind the scene’ pictures and videos.
Check out the resource on Social Media for Engagement for advice on how to get engagement online.
Evaluate
Your approach to evaluation of the animation will depend on its purpose; target audiences, the communications platforms used and the anticipated outcomes. For more guidance on evaluation see [link to evaluation guide, link to Evaluation: data capture and analysis from online engagement guide].
If the animation was shared with target audiences or those with lived experience of the topic as part of the production process - you will have already conducted formative evaluation. Other ways to think about evaluating the animation once it is shared include:
- Gathering YouTube, website, Twitter and other social media analytics that are built into these platforms including number of views; shares; liked and comment (although experience shows, you are unlikely to get many comments).
- Inviting feedback more ‘formally’ by providing an online or paper feedback form (depending on how it’s being shared) from your audience at large or to specific audience groups that you are know will be viewing the animation.
- Gathering information on when the animations have been referenced or referred to (either through online searches or you are informed by others).
- You could also reflect as an individual or team, including your partners (and possibly the animators) as may be appropriate to explore: what worked well or less well? What have we learnt? Have we developed/ enhanced skills from the process? What would we do differently next time? What is our sense of how the animation has been received? Has it resulted in new collaborations?
For further guidance our Online Engagement resource has advice on evaluating online activities, and you can also get in touch with the Institute of Engagement team for tailored advice.