
How to make a podcast - Part 2: Doing
In this section
Recording – Hardware
Hardware is the largest up-front cost of podcasting but is an important investment to get you sounding your best for your listeners. The main difference in equipment needs are if you’re going to be recording solo or with multiple guests:
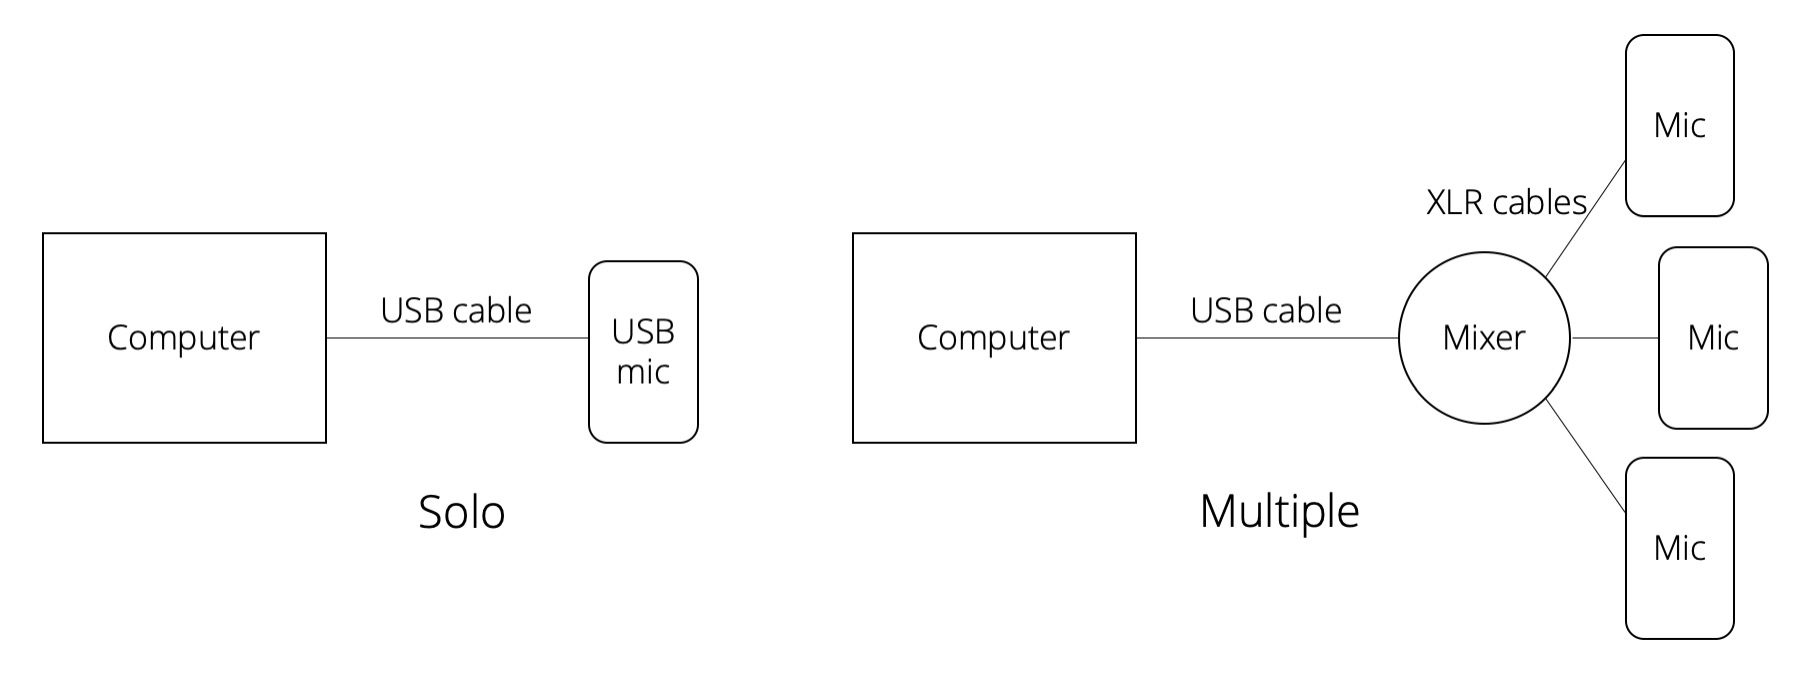

Solo
For solo recording, I recommend getting yourself a USB microphone which you can plug straight into your laptop and off you go. The Rode PodcasterLink opens in a new window is great.
If you want to shop around, your search term is “USB dynamic microphone”.
For any microphone you get, you’ll want to get a foam cover to cushion plosive sounds (the bang sound in the recording when strong blasts of air from your lips hit the microphone, particularly with ‘p’ and ‘b’ sounds) and a table stand for hands-free recording.
Multiple speaker recordings
For recording with multiple microphones, you’ll need to plug these into a mixer first, then connect the mixer to your computer. The Rode Procaster is great, and you’ll need as many XLR leads as you have microphones, as well as foam cushions and table stands.
If you want to shop around, your search term is “XLR dynamic microphone”.
The best mixer for podcasting is the Zoom H6 Audio RecorderLink opens in a new window. It can do ambient recording and has up to four inputs for microphones. It can be battery-powered so you can record out in the field.
If you want to shop around, your search term is “multichannel USB mixer”.
Setting up the room
Before you start recording, make sure you minimise the noise in the room (unless you’re purposefully including background noise in the recording, such as a busy street or audience chatter). Things to check for:
- Windows and doors closed
- All devices on silent
- Noisy appliances switched off
- Hard surfaces dampened – sit far away from flat walls or corners of rooms if possible, and place a towel or cloth across your table
- Noisy zips, jewellery or rustly clothing removed
Sit with your microphone about a fist-width away from your face and be aware that any movement away from it will be heard in the recording. If you’re speaking to one or more guests in the same room, then position yourselves so that you’ll be talking across your microphones, not turning your heads to look at one another.
Recording software
Once you’ve got your microphones and/or mixer plugged in, you’ll need software to record what people say. The best free audio software to start with is Audacity. It’s relatively intuitive to pick up, and there’s lots of support for specific problems online. See this video for an in-depth tutorialLink opens in a new window on how to get started.
If you want to move to the next level of audio recording and editing, I recommend Adobe AuditionLink opens in a new window. This is available as part of the Adobe Creative Cloud package which staff can request through IT services for an annual cost, and students can access at a discounted rate. Click here for more informationLink opens in a new window.
Recording online
For the best sound quality when recording with someone over video conferencing software, ask them to follow the same ‘Setting up the room’ instructions as above.
Ideally, when recording over videoconferencing software, your guests or co-hosts at the other end will record their side of the conversation locally on a lovely microphone set-up and send it to you post-recording for editing. This will allow for higher quality audio. Unfortunately, lots of guests don’t have the means to do this, but you can use your video conferencing software to record it for you. Ask them to use a microphone attached to headphones if possible, rather than their in-built computer audio hardware.
Zoom
The next best thing is using Zoom'sLink opens in a new window record function because it allows you to get separate audio files for each participant. Download Zoom, open it, and go to:
On a Mac: Zoom.us > Preferences > Recording and tick “Record a separate audio file for each participant.”
On Windows: Click the settings cog on the home screen > Recording and tick “Record a separate audio file for each participant.”
When the meeting starts, click Record at the bottom of the screen.
For better-quality audio, disable the participants’ video feeds and click “Turn on original sound” in the top left-hand corner – that disables Zoom’s echo cancellation and audio-enhancing features.
Microsoft teams
When the meeting starts, click More Actions > Start recording.
At the end of the meeting the recording will be available as a video in the Chat tab. You’ll have to download this and convert it to an audio file before editing. This audio file won’t differentiate between voices on the call, so you won’t be able to edit voices separately.
Record smart
Experience has taught me that recording smart can drastically reduce editing time later. My top tips for recording smart are:
- Leave a couple of seconds of silence between segments or questions in case you want to change the order later
- If you stumble on words or want to re-record a bit, you can click your fingers near the microphone. This will look like a sharp spike in the audio file waveform and will be quick to spot during editing. This is useful if you’ve got a particularly long recording.
- Speak more slowly to reduce the number of verbal ticks (like “umm”, “err”).
Guests
Unless your podcast is monologue or scripted, at some point you’re probably going to feature someone else’s voice, either through back and forth interviews or small monologue features. Here’s how to get the best out of them:
- Start the recording but don’t tell them you’re hitting the big red button. Ask them how their day’s been or what they’ve been up to to put them at ease.
- Seamlessly start the interview by asking them to introduce themselves. You may or may not want to use this audio, but it’s an easy first question and will help your guests to relax.
- Phrase questions as asking them to tell stories and signpost what you want them to use. e.g. don’t ask “how did you become a blacksmith?” ask “tell me the story of how you came to become a blacksmith. Feel free to go back to your childhood, family, schooling and training”
- If you’re asking someone about their work, don’t just say “tell me about your work”, ask them “what piece of work are you most proud of?” – that’ll allow them to go into detail about something that puts their work in its best light.
- Towards the end of the interview, ask them what’s next? Are there any unanswered questions? What are their hopes and dreams?
If you have guests on your podcast, you should always ask them to sign a Podcast Guest Release Form or undertake a written agreement on what you’ll be doing with their audio.
Editing
Audacity is quite intuitive software, but there are lots of online help pages if you get stuck, and there are some great tutorials out there to get you going.
Top editing tips:
- Always edit with each voice in a different track. This will allow you to make edits like cuts, mutes and control the volumes of each individual person.
- Don’t bother taking out every ‘um’ and ‘ah’ – it will take hours and the audience won’t notice if you do or if you don’t
- Increase the play-back speed on your editing software so it takes less time to listen through, particularly if you’re editing with a light touch.
To make your audio sound optimum with any software, you might want to use the following Effects:
- Amplify: makes it the right volume. Use the recommended amplification, and uncheck the box to not allow clipping.
- Equalisation (“Filter Curve EQ”): makes it sound bassier and smoother. Boost lower frequencies (below 200Hz) to between 10dB and 20dB. Lower the higher frequencies (above 4,000Hz) to between -3dB and -6dB.
- Compressor: makes the audio consistently loud. Set the threshold between -10dB and -16dB, leave the rest as default.
- Pan: pan each voice different amounts left and right (their track will be slightly louder through one headphone than the other) so that it sounds to the listener like they’re hearing people all standing in different places in the same room.
Check out this recording for a demonstration of these effects:
It’s not always easy to tell which section of your podcast is which on your recording just by looking at the waveform. Use the Labels tool in Audacity (Edit > Labels > Add label at selection) to annotate the tracks.
Exporting
Once you’re done editing your voices, have added music, jingles and listened to it all through one last time, you need to export your track. I recommend exporting as an .mp3 file using Audacity’s pre-sets for a reasonable file size (if you’re interested, you want about 160 kbps).
Distribution
Once you’ve got your file for uploading you need somewhere to put it where people can find it. This is called a host. Some of the most popular podcast hosts are:
- Acast
- BuzzsproutLink opens in a new window
- LibsynLink opens in a new window
- PodBeanLink opens in a new window
- SoundcloudLink opens in a new window
You can expect to pay for your podcast to be hosted by these services. Prices vary but are around £10-15/month. Some, like Acast, will automatically put adverts at the beginning, middle and end of your episodes, and pay you money back, depending on the number of listeners. Shop around and see which host is best for your needs.
Your host will give your podcast its own RSS Feed. This looks like a web address, and you need to give it to podcast distributors like Apple Podcasts and Spotify. Each time you upload a new episode onto your hosting website, this RSS Feed will pick it up and automatically push it onto the distribution platforms, so that if your audience are subscribed on a platform, they’ll get a notification and download it.
Your chosen hosting site will probably help you submit your RSS feed to the major distributors, but if you need to do it manually, you’ll want to give your RSS feed to:
- Apple Podcasts
- Spotify
- Google Podcast
- Stitcher
When you upload your episode, you’ll have to give it a title (it’s generally a good idea to make these consistent in style and format), and you can do an episode artwork too if you like. This is separate from the title podcast art, and could show the episode name and/or an image of the guest or content.
Note: The university does have it’s own free solution for hosting podcasts via SitebuilderLink opens in a new window. You would have to manually submit the RSS Feed URL from this page with the major distributors Anna lists above.
To host podcasts on of the cloud based services Anna mentions have a couple of considerations:
- Remember that online services come and go, and free hosts may make no commitment to keep your podcast online indefinitely. Make plans to keep master copies safe.
- To use University funds to subscribe to a service will involve getting approval from IDG to use the system as part of the process of responsible procurement.
You can see an example of a university hosted podcast page hereLink opens in a new window.
Marketing
You’ll want to advertise your new episodes across your social media. A great way to do this is with images of your guests or subject matter, and creating a snippet video using a site like Headliner.
Growing your audience
It’s always best to be as specific and targeted as possible with reaching audiences, but here are some general tips to follow too:
- Share with family and friends across your personal social media
- Post content on your podcast’s social media feeds, using relevant hashtags
- Promote on web forums and social media groups relevant to your audience
- Start a mailing list
- Pay for targeted ads across social media
- Cross-promote with other similar podcasts; create a 30s audio advert you can send to your friends to put on their podcasts, and return the favour with theirs
- Film your recordings and upload them to YouTube to access new audiences on a different platform
Accessibility
Whilst podcasting is a very accessible medium, you can broaden your accessibility by creating transcripts of your episodes. There are various clever ways to do this for free, or you can pay a small amount for an online service to do it for you, such as Scribie. Put the transcripts on your podcast’s website.
Note: All university staff and students are able to access Microsoft Stream and can upload media here privately and generate an editable transcriptLink opens in a new window. This is a quick and easy way to generate a free transcript. The university also recommends Otter.aiLink opens in a new window as a paid for service you can use. For more information on generating transcripts visit the ITS support pagesLink opens in a new window.