Moodle books
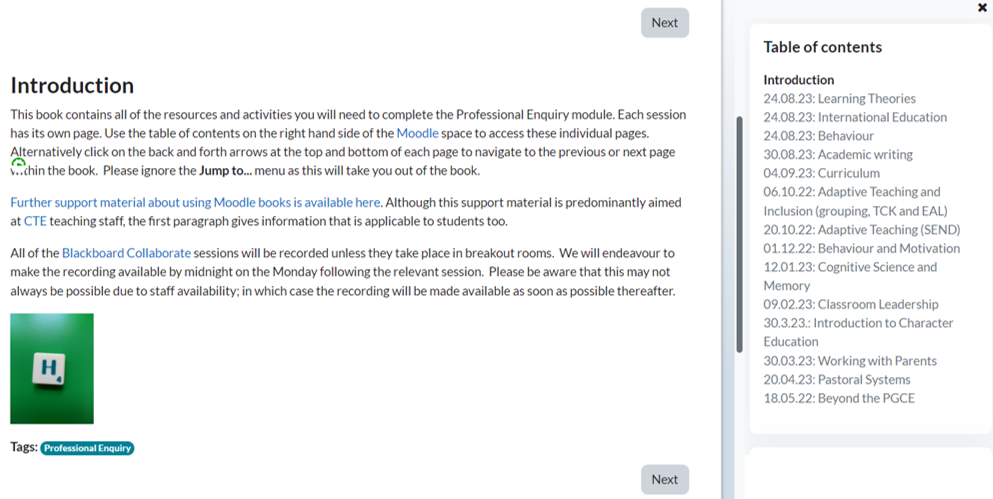
The Moodle book tool enables you to create a series of web pages with a content menu (shown on the right here) and next and previous navigation buttons at the top and bottom right of each page.
The web pages can be organised into multi-page resources which can include content copied from HTML or Word files. The book is not interactive but you can add text, images, links to URLs, links to discussion forums or quizzes and even multimedia objects like Flash movies. You can also insert links to individual files into a book.
The books are organised into chapters and subchapters but have no further levels. A chapter can have several subchapters but subchapters cannot have further subchapters. Books can be printed in their entirety or chapter by chapter.
Having turned editing on, navigate to the section that you want to add your book to and then click on the Add an activity or resource link. Choose Book from the drop down menu and then click on the Add button at the bottom of the dialogue box.

Give your book a Name (this is the link that the students will click on to access your book from a particular section of the course). Click on the Expand all link at the top right of the screen to expand all of the book fields.
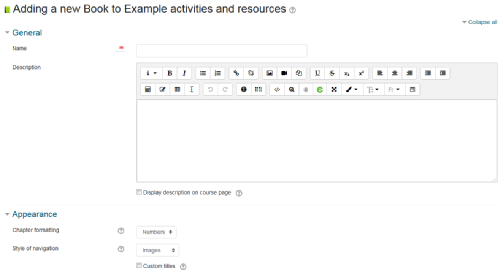
Briefly describe the content of the book in the Description section (remember to tick the Display description on course page checkbox) and then choose how you want the chapters to be displayed from the Chapter formatting menu in the Appearance section. You have four options – None, Numbers, Bullets and Indented.
1) None – chapter and subchapter titles are not formatted. Use this option if you want to customise your chapter titles.
2) Numbers – chapters and subchapters are numbered sequentially.
3) Bullets – subchapters are indented and displayed with bullet points.
4) Indented – subchapters are indented.
The Style of navigation drop down menu will allow you to choose how you want your students to navigate through your book. You can use just the table of contents (TOC Only) on the right hand menu; Images (the back and return buttons) or Text (chapter titles to the top left and top right of each page). As a bare minimum you will always have the table of contents option even if you do not choose any of the other options.
If you leave the Custom titles checkbox unticked, the chapter title that appears in the content menu will appear as a header at the top of your chapter or subchapter page. If you enable Custom titles (by ticking the checkbox), you will be able to create a different title at the top of your chapter or subchapter page to the one that appears in the content menu (or display no title at all).
For the purposes of this guide we will not be looking at the Common Module Settings or the Restrict Access sections (or the Activity Completion section if it has been enabled). Add any Tags that you want to your book and then click on the Save and return to course button to complete the process. A link with a book icon will be added to your course.

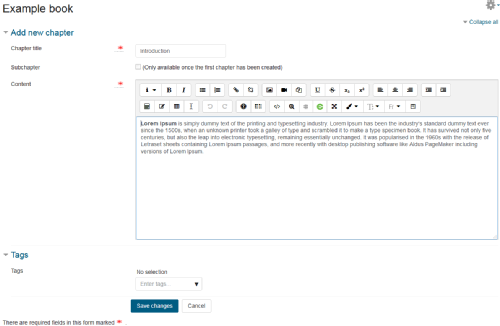
To add your first chapter to your book click on the blue title of your book (not the Edit menu as this will take you back into the book edit settings interface as above). In the example above you would click on the Reflective Practice Sessions link.
Give your chapter a title by filling in the Chapter title field and then add your content to the Content box. Ignore the Subchapter checkbox at this stage. Click on the Save changes button to complete the process.
Your new chapter will be displayed with a Table of Contents on the top of the right hand menu and back and return navigation buttons above and below the content (if you chose the Image option from the Style of navigation menu).

To edit/re-edit your chapter, click on the cog icon below its title in the right hand Table of Contents.
To delete the chapter, click on the cross icon and to show (or hide) the chapter, click on the eye icon.
To add further chapters or subchapters click on the plus sign at the appropriate point in the table of contents. New chapters (or subchapters) will always be added underneath the section where you clicked on the plus sign.
Once you have created a chapter, you can create a subchapter by ticking the Subchapter checkbox in the Editing chapter dialogue box.
You can move the chapters (and subchapters) up and down the Table of Contents with the up and down arrows (which will appear once you have more than one chapter).
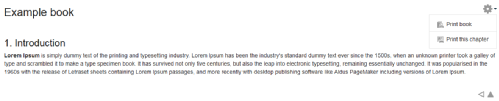
To print a book or a chapter click on the Print book or Print this chapter link from the Cog menu at the top right hand side of the page. If these options are not visible then they have not been enabled for your current role.