
Using PowerPoint to create screencasts
PowerPoint is available for all Warwick staff and students via Office365. Further information about how to download Office365 is available here:
https://warwick.ac.uk/services/its/servicessupport/software/microsoft/o365proplus
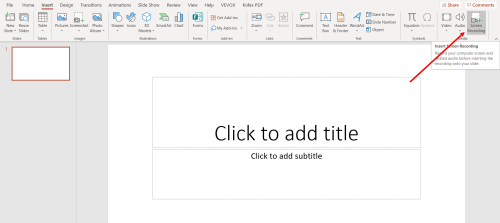
Open PowerPoint and from the Insert ribbon click on the Screen Recording button at the far right of the ribbon.
This will grey out your screen and display a little toolbar at the top. You can pin the toolbar to the top of the screen by clicking on the little pin icon at the bottom right of the toolbar. This is useful if you want to pause the recording at any point, but if you have chosen to record the whole screen, the toolbar will appear in the final recording. If you have only chosen a portion of the screen to record which does not include the toolbar, then it won't appear in the final recording, even if you have pinned it.
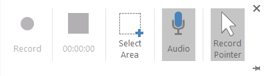
From this toolbar you can then choose what you want to record. Click on the Select Area button and click and drag the cursor (which will change to a crosshair) around the section you want to record. If you want to record the whole screen, click and drag from the very top left of the screen to the very bottom right of the screen. The recording area will be highlighted by a red dotted line. If you plan to switch between browser tabs or software, select the whole screen. If you only want to record a specific portion of the current screen just select that area.
If the Audio button is grey (as in the picture above) then any audio will be recorded automatically with the content on the screen once you start recording. If it is white rather than grey and you want to record audio, then you will need to click the Audio button once.
If the Record Pointer button is grey (again as in the picture above) then your cursor movements will be recorded with the content on the screen once you start recording. If it is white rather than grey and you want to record your cursor movements then you will need to click the Record Pointer button once. It is good practice to record the pointer movements if you are going to be opening menus or clicking on lots of buttons, as it is sometimes easy for viewers to miss exactly what happened on the screen if the process you are recording is quite complex.
When you’re ready to record, click the Record button on the toolbar which will become available once you make your selection. You get a three second countdown before the recording begins and PowerPoint will tell you that you can end the recording with the Windows logo key+Shift+Q keyboard shortcut. If you haven't pinned the toolbar to the top of your screen, write this keyboard shortcut down and display it somewhere obvious as it is not easy to remember. If you have pinned the toolbar then you can Pause the recording and Stop the recording at any point using the relevant buttons on the toolbar.
Your recording will be automatically added onto your PowerPoint slide. To save your recording, right click on it and choose Save Media as... from the menu that appears. The recording will be saved in .mp4 format.
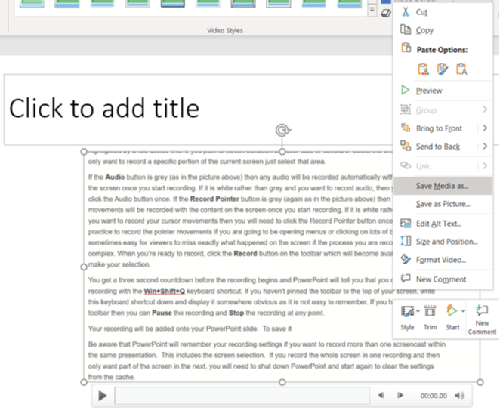
You'll notice at the very bottom of the toolbar that there are some extra menu options. Style will allow you to change the shape of your screencast window as it appears on the slide in your presentation. If you are not planning to use your recording this way (i.e. if you only want to save it as an .mp4 file) ignore this option. Trim will allow you to trim the beginning and end of your recording.
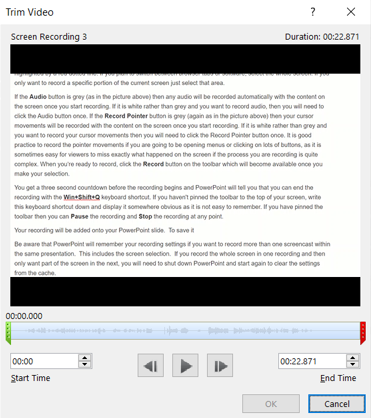
Click and drag the green or red sliders to trim either end of the recording or add the start and end times into the Start Time and End Time boxes and then click on OK.
Start allows you to choose whether you want your recording to play In Click Sequence, Automatically or When Clicked On. This is only relevant if you are using your recording as part of a presentation. The Comment option just allows you to add a comment to your recording. Again this is only relevant if you are using your recording as part of a presentation.
Be aware that PowerPoint will remember your recording settings if you want to record more than one screencast within the same presentation. This includes the screen selection. If you record the whole screen in one recording and then only want part of the screen in the next, you will need to shut PowerPoint down and start again to clear the settings from the cache.
If you are a member of staff in CTE you have a legal requirement to provide an alternative text version such as a transcript or captioning file to accompany your recordings. Further information about transcripts and captions is available here: