
Getting setup to teach synchronously using Teams
Problem
When teaching synchronously (live) in Teams meetings, you may need to do quite a few different tasks at the same time - some of which are continuous, some of which just require you to "keep an eye on things". This is logistically hard to arrange, but can also seem overwhelming:
- show a presentation to the students;
- show and work with other applications, such as web pages and documents;
- keep an eye on the current time;
- monitor the participants list;
- mute student mics;
- watch out for students raising their hand (using the Raise Hand button);
- monitor and respond to chat messages;
- see your students' web cams so that you can see their reactions;
- control Vevox polling and Q&A;
- show Vevox responses to the students on the shared screen;
- and more!
You might also struggle if you can't see the students when you are presenting, as Teams hides the Gallery and Together views so you can see your own slides.
Solutions
We have experimented with a range of techniques and technologies to make it easier. Here's our advice.
Divide your setup into five aspects, and consider how you can arrange each one to make it as comfortable and effective as possible. The aspects are:
- the teacher's view: the session management tools, your view of the students and any messages coming from them, and other key tools such as a clock/timer and your personal notes on the session - this is your view, not shared with the students;
- the teacher's presentation to the students - slide sharing or screen sharing;
- the students' view: what they see on their screens, which may be your webcam, other students, chat, the slides and screen you are sharing with them, and other applications (such as the Vevox Presenter view);
- your physical position, chair, desk etc.
- your own webcam and mic arrangements.
Work out an arrangement of these 5 aspects in advance, setting them up for yourself before a session, communicating what you need the students to do, and testing out your setup with students or colleagues.
We will deal with points 4 and 5 in separate guides.
How to see your students when you are presenting
Before we go into more depth, we need to mention an often misunderstood feature of Teams. When you share your screen or a PowerPoint, your view of the students (seen as their webcams) disappears. This means you cannot easily watch for visual cues from them. However, you can bring the view of your students back and show it in a window.
Firstly, you might find that your view of the meeting has been minimised to a tiny window at the bottom right of the screen. Double click on it to bring it back up before doing this.
In the meeting bar (which on recent versions of Teams appears at the top of the screen), click on the three dots (1 in the screen image below).
In the view options (2), select either:
- Gallery to see 9 students on the screen;
- Large Gallery to show up to 49 students (only enabled if you have 10 or more students with their webcams switched on);
- or Together mode.
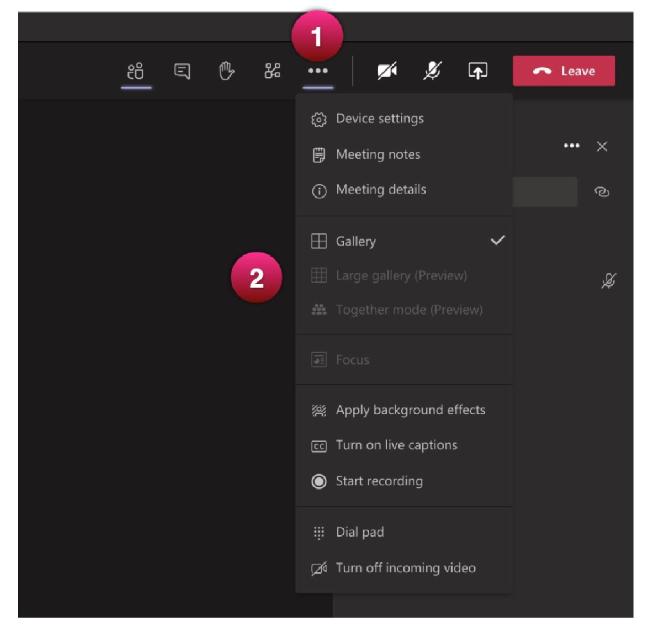
This last option, Together mode, seems particularly good for teaching - you see the students as if they are sitting in a lecture theatre. They stay in the same positions. Microsoft are adding improvements and new layouts to this view. In the 2 Screen Example (further on in this article), you will see Together mode displayed on a second screen. This works especially well, as you can look up from your presentation and see your students in front of you in a relatively natural arrangement.
Consider how your students will participate
The third point, the setup that your students will use, is really important. In an ideal world, we can assume that each student is using a nice big computer screen, or perhaps even two screens. But that is rarely the case. So if you want them to be in a videoconference and working on a shared file will they be able to do that? If you want them to be looking at your slides and responding to Vevox questions, how will they do that? They might be able to arrange all of those elements onto one screen. Or perhaps you encourage them to connect to the video conference or the Vevox meeting using a mobile phone so that they can do other things on their computer. It's a good idea to advise them in advance and allow them to get set up to participate effectively.
Consider how you will display all of the different elements you need to see and to share
The first three points are the most challenging.
Here are some options:
- the 2 screen strategy: this is the best approach, but requires a second physical screen - more information here;
- use a computer and a second device, such as a tablet (e.g. iPad) - details here;
- two virtual desktops on one physical screen, with a PowerPoint shared with the students - details here;
- have everything on one big screen, but just share a selected window or PPT - details here.
Let's look at each of these approaches in turn.
1. The 2 screen strategy
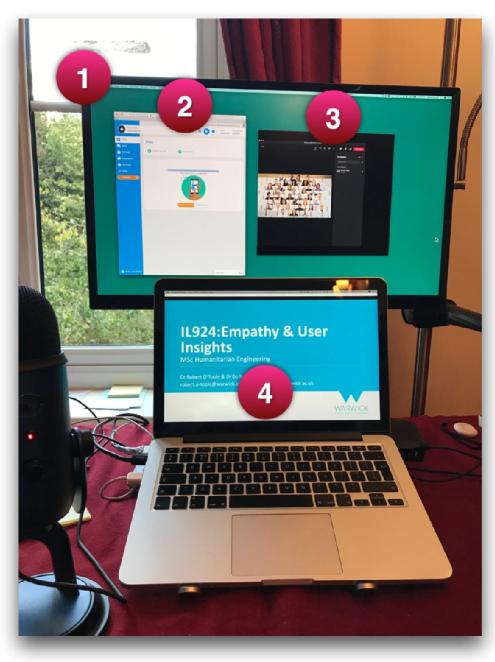
Separate out your teacher view and what you are presenting to the students onto two separate physical screens. Make sure that your second screen is set to be an extension of your first, rather than mirroring it (Apple, Windows). This makes it a lot easier. You might, for example, have your presentation (shared with the students) on a laptop screen, and your session management screen on a second screen raised above it. You can then have Teams showing a view of the students when you look up from your laptop screen. Use the Together mode in Teams to make this look like a real lecture theatre. In this photo, we have the teacher's management screen (1) with the Vevox dashboard (2) and the Together mode view of the students (3). And then below that on the laptop screen, we have the presentation screen being shared with the students (4).
Let's go through some of the things we might have on each screen.
First, the teacher's session management screen, the elements of this could be:
- Vevox meeting management dashboard - manage student Q&A, polling, surveys, etc.
- Teams meeting management, showing Together mode - see the students live, watch for raised hands, chat, etc.
- Teacher's private notes, not shared with the students (in this case OneNote, but could be a different app).
- Timers, clock, etc. (in this case an app called Timer Plus).
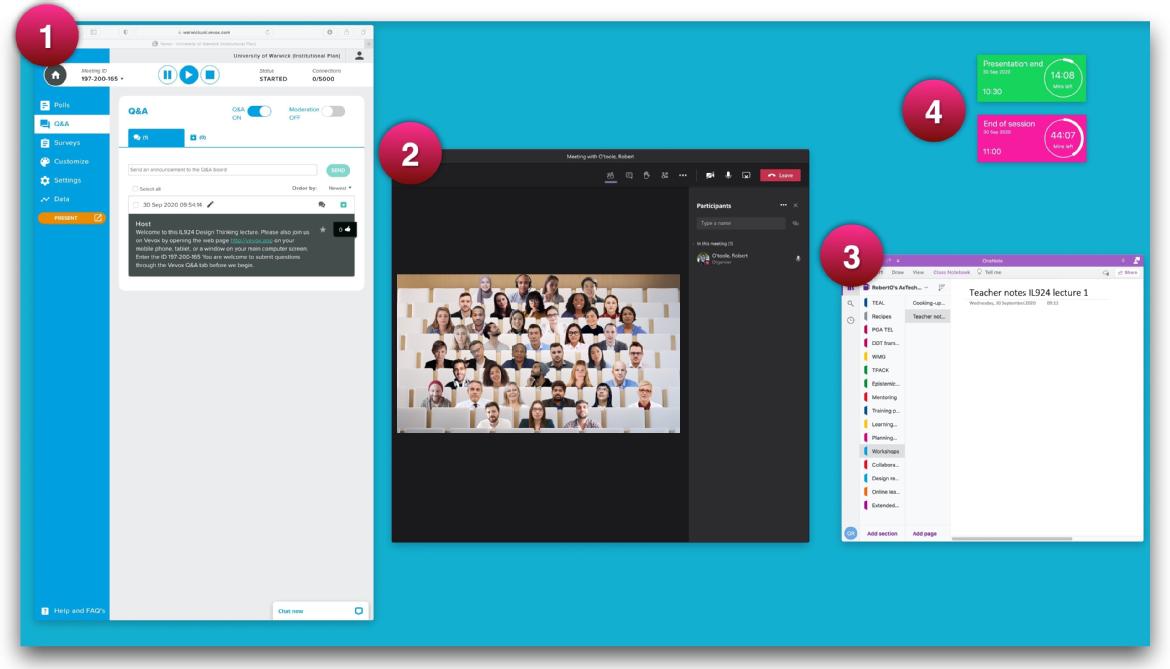
And then we have the second screen on which we place the things we want to share with the students:
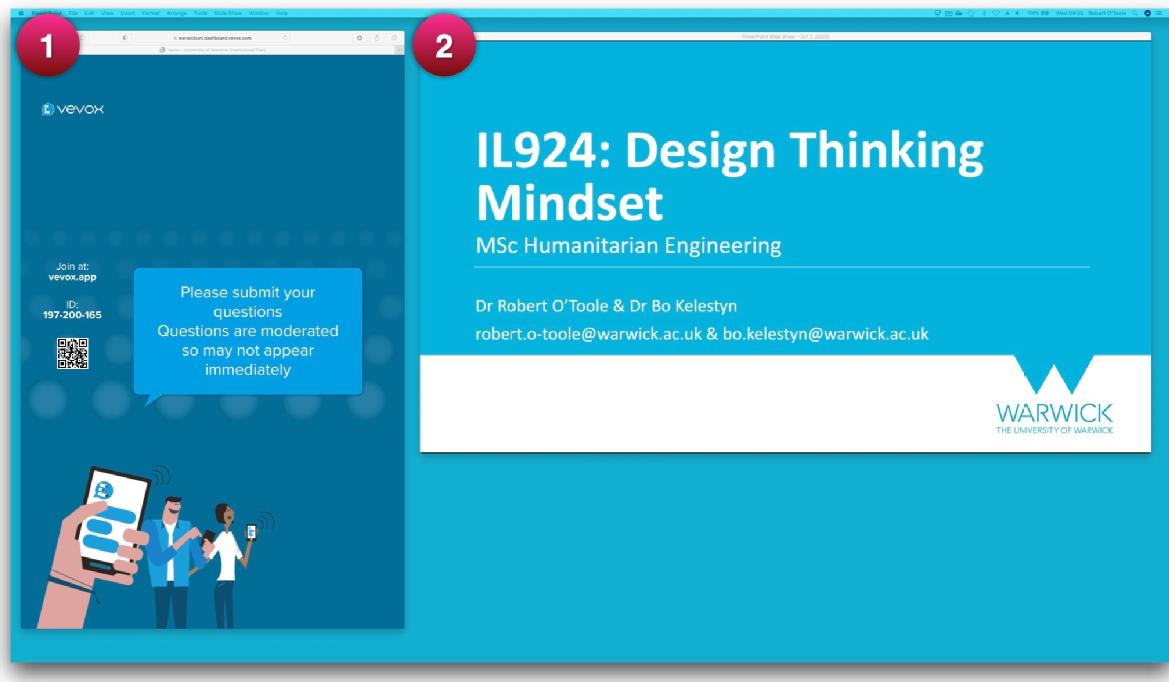
- In this case, we are showing a browser window with the Vevox Present view, in a real lecture theatre, we might be sharing this on the main screen.
- And we have the PowerPoint slides for the session running in a Window (so not full screen - Windows Apple).
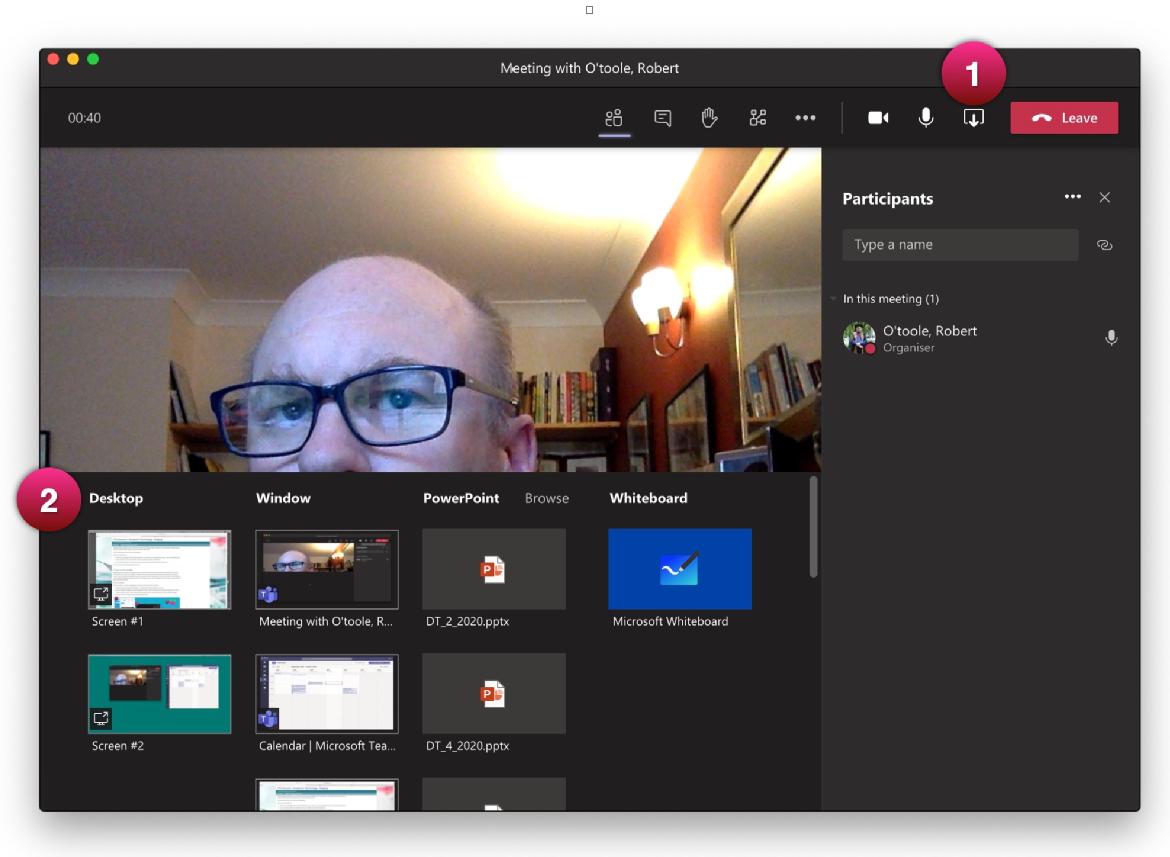
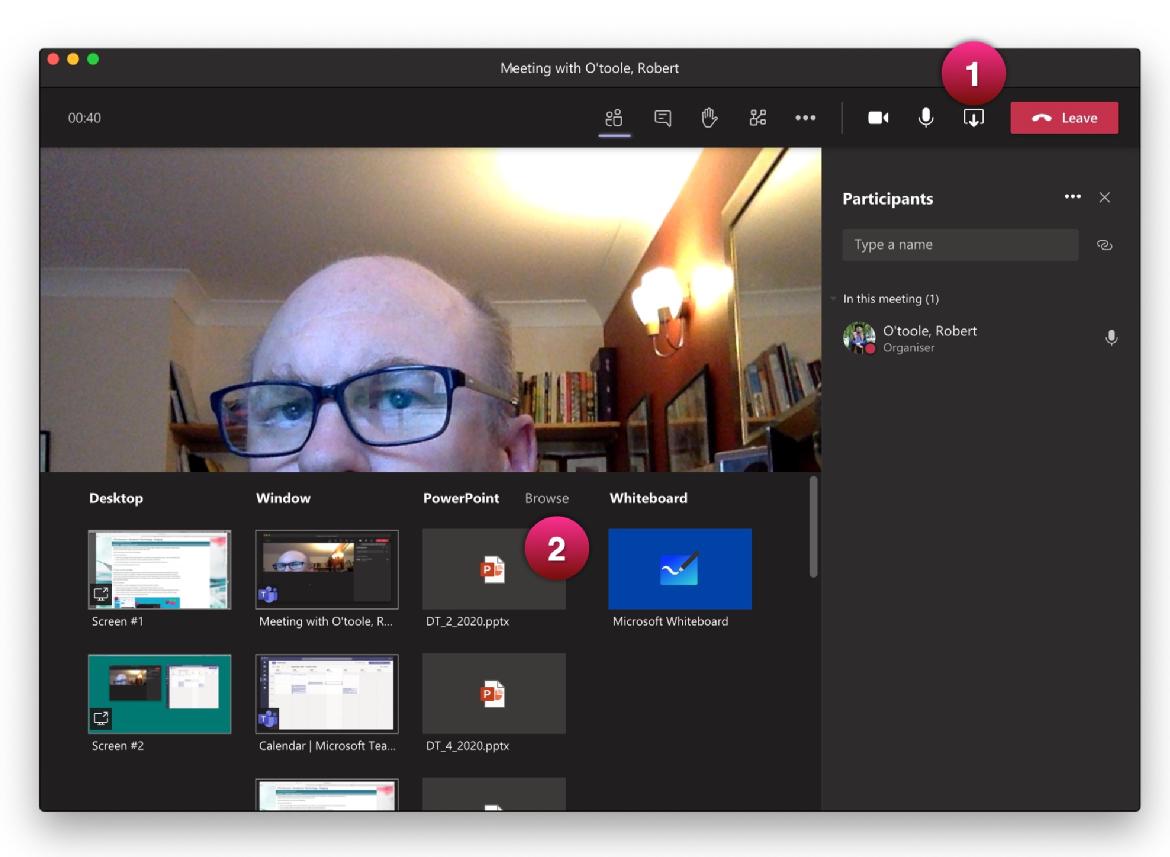
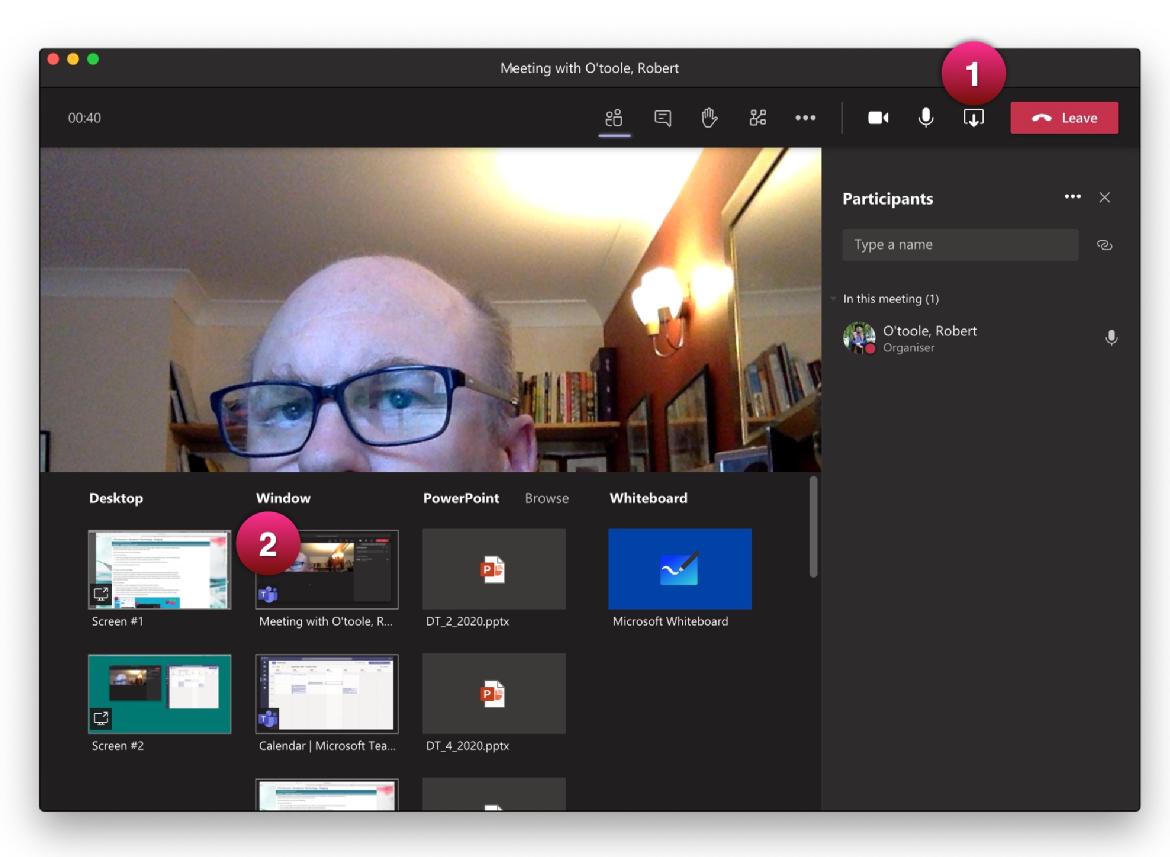
When sharing your screen in Teams (using button 1 in the image below), you have the option of sharing your desktop, a specific window, a PowerPoint file, or a Whiteboard. If you have multiple physical screens, you will see them listed under Desktop (2), and you can choose the one you want to share.
2. Use a computer and a second device, such as a tablet (e.g. iPad)
It is possible to log in to Teams on more than one computer or device. You can even join the same meeting on more than one device. You can then use different devices for managing the meeting, sharing your screen, and viewing your students. There are lots of possible combinations. You might also use a separate device for managing a Vevox meeting.
You might also advise your students to use two devices - for example, a combination of phone for the Teams videoconference and laptop for working on shared documents.
3. Two virtual desktops on one physical screen, with a PowerPoint shared with the students
Both Windows and Mac include systems for creating "virtual desktops" - that is to say, have more than one different view set up on a single physical screen, and being able to switch between those views. So you could have one of your virtual desktops showing your session management tools (as in the 2 screens strategy above), and another with the PowerPoint presentation you are sharing with the students. You can then switch between the two virtual screens as needed. Read about how to do this:
There is a significant disadvantage with this approach:
- If you share PowerPoint (or anything else) running on one virtual desktop, Teams will stop sharing the screen that you want the students to see when you view a different virtual desktop. Their view will go blank.
To avoid this, you can share the PowerPoint file with the students rather than the screen. Teams will then play the PowerPoint file to you and the students, giving you the ability to move through the slides. If you look at a different virtual desktop, the PowerPoint continues to be shown. The screenshot below shows how. Note that in this case you cannot show Vevox at the same time, and you cannot use the PowerPoint Vevox add-in (for Windows).
4. Have everything on one big screen, but just share a selected window or PPT
If you have a large enough physical screen you could do all of the above on that screen. In this case, use the option to share a PowerPoint (described in 3 above), or share a selected window showing just the application you want the students to see. This is not so good if you want to show multiple applications (e.g. slides and Vevox). You can switch between windows by stopping sharing and then selecting a different one to share, but this is a bit clunky.
Strategies
- the 2 screen strategy: this is the best approach, but requires a second physical screen - more information here;
- use a computer and a second device, such as a tablet (e.g. iPad) - details here;
- two virtual desktops on one physical screen, with a PowerPoint shared with the students - details here;
- have everything on one big screen, but just share a selected window or PPT - details here.