3D Printed STEM Experiments
3D Printed STEM Experiments you can recreate at home
You might have heard of 3D printers before – it’s a robot that can squeeze melted plastic into just the shape we want it and make products from ideas into prototypes within hours. You may even have seen that people are using 3D printers to make PPE for healthcare workers at the moment. WMG are using 3D printers a little bigger than this one to do just that. Find out more and read the whole story here.
I’m going to show you 3 tricks with 3D printed parts.
The first trick is about how you empty water from a bottle. Good science is all about making predictions and then testing them, so what do you think is going to happen when I turn a bottle full of water upside down? Watch the video below to find out and learn how to try it yourself.
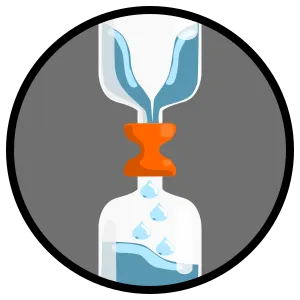 |
Tornado Tubes3D Print it:https://www.thingiverse.com/thing:4147288 Recreate it:Ask an adult to help you cut, drill or melt a small hole in the top of a bottle lid. The hole should be just slightly bigger than the size of a pen. Fill the bottle with water, put the lid with a hole in it back on and then hold the bottle over a bucket before trying this! |
 |
The top bottle is not empty - it just looks it. It's actually filled with air. When you turn the bottle upside down the water wants to rush downwards and the air wants to rush upwards and swap places with the water but they get in each other's way. It takes a long time to empty the bottle when the air has to form into a big bubble and blob blob blob up into the bottle above and then a big drop of water drips into the bottle below. When you spin the top bottle you are sending the water to the outsides of the bottle and the air can then come through the middle of the whirlpool smoothly and easily. When you swirl the bottle you make it easier for the two things - air and water - to get past each other and the bottle empties faster! |
 |
To get the fastest flow possible we need to make sure that as the water flows downwards there is air ready to take the space up in the top bottle. Otherwise a vacuum will start to form and - as you know from the vacuum cleaner - vacuums suck and pull on things. In this case, the vacuum would pull on the water and stop it from flowing downwards until a bubble of air can get through the connection between the two bottles and replace the space left by the flowing water - filling up the vacuum, returning the pressure to normal and the water can flow again. Swirling the bottle pushes the water out to the sides of the bottle the same way that if you are on a roundabout and it starts to spin you get pushed out to the outsides of the roundabout and have to hold on tight! The air weighs less than the water so it doesn't get pushed outwards quite as hard so stays close to the middle - flowing upwards through the whirlpool. |
 |
When you swirl the bottle you are essentially making a centrifuge - a spinning tool that is used to separate things based on how heavy they are. Here, we have two fluids trying to mix together - water and air. The water is far more dense than the air. When you start up your centrifuge by spinning the top bottle you are applying force to the fluids - they will be forced outwards towards the sides of the bottle. This centrifugal force is more powerful the heavier the fluid is so the water ends up forced further from the centre of the bottle than the air does. You can use a centrifuge to separate out lots of things from fluids - like getting the fat out of milk or separating the different components that make up blood, for example. |
The second trick is called Pythagorus’ Cup, Mr Triangles himself, also known as the greedy cup because you can fill it up no problems without it leaking…. Unless you get too greedy and try and pour too much in! Then it will all leak out and empty the entire cup!
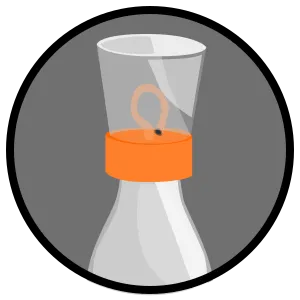 |
Greedy Cup3D Print it:https://www.thingiverse.com/thing:4307850 Recreate it:Ask an adult to help you cut, drill or melt a small hole in the top of a bottle lid and in the bottom of a plastic cup. The hole will need to be as close to the same width as a plastic drinking straw (re-using them is better than just throwing away a single-use piece of plastic!). Place the plastic cup on top of the bottle lid, lining up the holes. Push the straw through both holes with the bendy part of the straw in the cup side. Ask an adult to help you stick the whole thing together - you can use a hot glue gun or tape, so long as the seal between the cup and the bottle lid is watertight! Hot glue seems to work the best. You will also need to seal the hole around the drinking straw using either hot glue or modelling clay. You can then pour water into the cup and it will only leak through the straw once the water level is above the top of the curved part of the straw. |
|
Water always wants to flow downwards - so it wants to get from the cup at the top to the bottle at the bottom. There is a straw in the middle of the cup that gives the water a way to go to flow into the bottle but there's a problem - the straw starts going upwards first and then goes downwards and we know that water can never flow uphill! The water will only start to pour into the bottle at the bottom when the water fills the cup above the very top of the straw - now the water can flow downwards from the top of the cup through the straw and into the bottle so it does end up going downwards at the end - it just goes a little bit upwards to start with. |
|
You are forming a siphon when the cup starts to empty. A siphon allows water to flow upwards briefly so long as it ends up flowing to somewhere lower down than it started - gravity ends up winning because the water finishes its flow lower down. All you need to start a siphon is the initial push to get water to go over the curve in your tube - so if you try this with a bucket and a hosepipe - put the bucket up on a table and the hose on the ground. If you suck on the hosepipe until the water is past the highest point of the hose it will continue to flow out until the water in the bucket is lower than the other end of your hose! It is ending up flowing downwards and you've provided the initial push to get the first bit to flow upwards - after that each bit of water that flows through the tube pulls on the water around it and pulls more and more up the tube in a continuous stream because water likes to stick together with more water - this is a force called capillary action. |
|
Capillary action can pull water all the way through the straw - even as the water flows uphill against gravity. There is a little force between all the water molecules in the liquid that likes to keep all the water together in one stream, so the water that is leaving the bottom of the straw pulls on the water in the straw and that pulls on the water still in the cup! This cohesive force sticking the water together as it flows is stronger than the downwards pull of gravity so the pulling force of the water leaving the bottom of the straw is strong enough to overcome gravity and allow the water to briefly flow upwards. You need to start the whole thing off with a little energy to get the first bit of water to the end of the straw and from then it works by itself. You provide this energy by pouring enough water into the cup to completely submerge the straw - there is now a pressure from the water in the cup pushing the air out of the straw and filling it with water instead. |
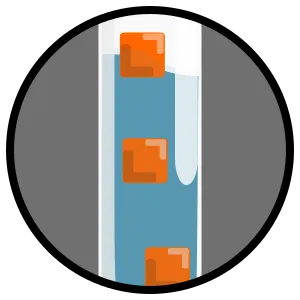
The third trick I’ll show you is about density. We have printed these cubes to weigh exactly how much we want them to so that when I drop them into this glass of water this one will sink, this one will float and this one is special – it will sink half way and then stop. So what would you call that? Soating or Flinking?
|
The liquid in the glass is water but there's actually a clever science trick here. You can get salt to dissolve in water and that makes it heavier and heavy things like to sink! If we pour the heavier, saltier water into the glass first and then really carefully pour the water without salt - we call this fresh water - down the sides of the glass then the two don't mix! We have heavy, salty water at the bottom of the glass and lighter, fresh water on the top. The three cubes weigh just enough so that one of them will float on both salty and fresh water, one will sink through both and one will sink through fresh water but doesn't weigh enough to sink through the salty water at the bottom so it stays in the middle! |
|
Density is how much stuff you have in one place. When we add salt to the water we are making it more dense than fresh water. Gravity pulls down on heavier things with more force and so heavy things get pulled downwards more than lighter things - this is why something will sink if is more dense than the fluid around it - gravity is pulling down on the sinking object more strongly than on the surrounding fluid! In the case of the salty water, it is being pulled down more strongly than fresh water so it stays at the bottom of the cup. When you drop an object in it will either sink or float through the fluid depending on whether gravity is pulling the fluid or the object downwards more strongly - which depends on the density of that object or that fluid. The object that gets stuck sink-float-ing in the middle of the glass has sunk downwards because it is pulled more strongly downwards by gravity than the fresh water but it isn't pulled downwards as strongly as the salty, denser water! The object is not pulled down enough to sink through the salty water layer so it floats there in the middle of the glass. |
|
The density of water is defined as being 1 gram per millilitre - a nice round number! This means that a litre of water (1000 millilitres) weighs a kilogram (1000 grams). If you add 100 grams of salt to a litre of water - it will now weigh 1100 grams but the volume won't have changed much - so it's density will go up to about 1.1 grams per millilitre. If you find an object that has a density less than 1 gram per millilitre it will float in water no matter what. If you find an object that has a density greater than 1 gram per millilitre it will sink in fresh water - if it is only just over 1 gram per millilitre - say 1.1 grams per millilitre like the cube in the middle - it will float on salty water and get stuck in the middle. If you find an object that has a density greater than about 1.5 grams per millilitre it will sink in salty water too! |