Other Areas
Introduction
In this section some other interesting techniques and applications of ultrasonic measurements are discussed that are not core areas of research. They do however have great potential for a variety of applications, both contact and non-contact.
Air coupled ultrasonics
We have a few different types of ultrasonic transducer. The two most useful are membrane type transducers and piezoelectric transducers that have a matching couplant layer into air. The membrane transducer basically works like a capacitor - its consists of a rigid electrically conducting back plate and a flexible conducting front membrane, separated by a thin dielectric layer. Using this type of design we can inexpensively and easily produce air-transducers working at several hundred kHz.
A second (and far easier) approach is to fix a matching layer of our dry couplant material to a piezoelectric transducer. This material has acoustic properties that are somewhere between air and the piezoelectric transducer, and has the effect that coupling efficiencies can be increased by at least two orders of magnitude. Ideally we would design the transducer to only operate in air and have optimal efficiency for operation in air, such as by ensuring that the matching layer was the correct thickness to behave like a quarter wave plate giving maximum transmission. However an off-the-shelf transducer has sufficient sensitivity with the matching layer to work up to a few MHz in air! The figure below shows some results obtained with a focused transducer with a matching layer in air operating at around 800kHz, at a stand-off of around 10cm.
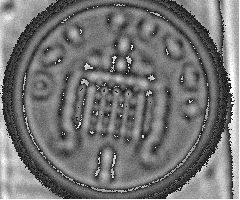
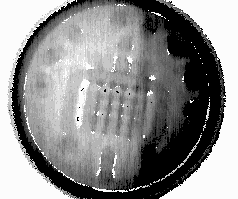
Figure 1
The image on the left is an air coupled amplitude C-scan of a penny, and that on the right is a transit time C-scan of the same penny. Note that the line on the right hand side of the left image is the edge of the double sided tape used to hold the penny in place. The image on the right is not as clear as that on the left as the time based measurement in this case more prone to systematic error. This is an unusual case where ultrasonic measurements are concerned where it is nearly always better to perform a measurement in the time domain. In this case the frequency of the ultrasound (approximately 800KHz) has a wavelength of 0.4mm which is slightly more that the height of the features that we are trying to measure. The amplitude scan is really a measure of degree of scattering of the ultrasound on the discontinuities of the coin surface. You will find that most people present the amplitude scan because it looks better.
Dry coupled ultrasonics
Most of our work is concerned with non-contact ultrasonics but we also need to be aware of state of the art equipment for contact ultrasonics, and we will use contact ultrasonics where it is appropriate. The use of dry couplant materials has been well documented and have attracted significant interest as in theory they remove the need for a liquid couplant medium. Existing dry couplant materials usually require specialist manufacture procedures and typically a significant amount of pressure must be applied to maintain good ultrasonic coupling between the couplant and the sample. The material described here is cold castable, and when produced is very flexible and highly deformable and thus requires low pressure loading for good ultrasonic coupling. This means that the material is particularly suited to automated inspection systems. The new rubber is not as physically tough as some of the alternative dry couplant materials but can easily be replace d in the field if necessary . We have made small prototype wheel probes using this material, which have worked quite successfully.
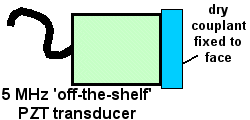
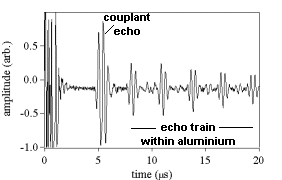
Figure 2&3
The schematic diagram shows how simple it is to convert a standard transducer to a dry coupled transducer - the dry couplant is fixed to the transducer with double sided tape! The waveform on the right is obtained on an aluminium sample with a rough surface (0.25mm deep scratches). The first large pulse is a reflection from the couplant-aluminium interface. The proceeding signals are echoes within the aluminium sample.
High temperature thickness gauging using dry couplants
Our new dry couplant material can also be used at elevated temperatures of up to 400oC. Measurements shown below in figure 4 were taken at high temperature, by leaving the couplant in contact with the samples for less than 10 seconds for each measurement as the transducers attached to the couplant were not rated to operate at high temperature. The material can also be used on ‘rougher’ surfaces than the more rigid alternatives. At elevated temperatures the material will of course eventually suffer degradation, but it is envisaged that the dry couplant could be treated as a consumable product if this occurs and immediately be replaced in service. An angled shear wave probe has also been manufactured using an ‘off-the-shelf’ compression wave transducer (see figs. 5&6) coupled to the new material at a suitable angle.
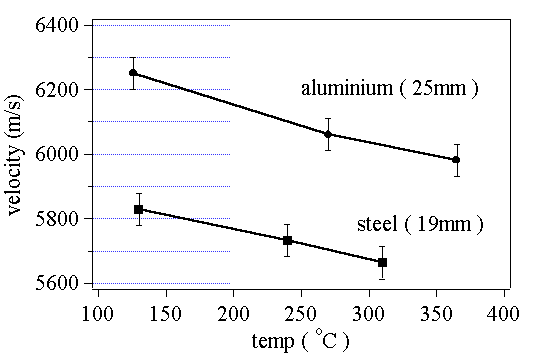
Figure 4
The above results were obtained on both aluminium and steel at a range of temperatures up to a surface temperature 370oC using a dry couplant material and a piezoelectric transducer. As expected the velocity decreases with increasing temperature.
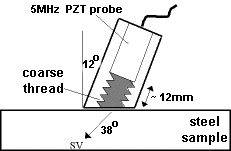
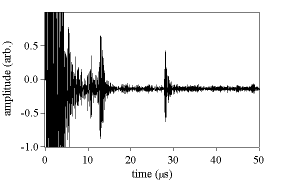
Figure 5&6
The schematic diagram on the left shows the cross-sectional construction that was used to manufacture a dry coupled angled shear wave probe capable of operating at high temperatures. The waveform to the right was has features that correspond to reverberations within the dry couplant delay line up to times of 15µs. The feature at 28µs is a reflection from a 1mm diameter side drilled hole in an aluminium block - this measurement was taken at 250oC.
Liquid level measurements
Currently every beverage can and every other food or drinks product on a production line has been tested for fill level by passing a beam of high energy gamma rays through it. The short exposure to gamma rays should not change or contaminate the contents - the main concern is that radio-active sources are being used in the workplace. In addition to radio-active sources not being particularly 'environmentally friendly' their use in the workplace also has associated extra costs and onerous legislation. The technique works by illuminating a container with a broad beam of gamma rays at a location around the expected content level, some of which the are absorbed by the contents of the container. The gamma rays are 'counted' by a scintillation tube on the opposite side of the can and basically a higher level absorbs more gamma rays and gives a lower count. Height of contents is proportional to the content volume and thus a level measuring system is really a volume measuring system.
We have developed an ultrasonic solution to the problem of inspecting beverage cans that is not only more environmentally friendly but gives an exact measure of liquid height and is far more accurate than the alternative techniques. It works by generating a divergent ultrasonic wavefront on one side of the can below the liquid level. The geometry of the situation means that there are only two possible discrete arrivals on the opposite side of the can as shown below. By measuring the time between these two signals and a reverberation within the can we can obtain a self-calibrating exact measure of liquid height in the container - we don't need to know ultrasonic properties of the contents. In a static test we can measure liquid height to better than 100µm.
The ultrasound was detected using an EMAT on the opposite side of the can to the generator (see EMAT section). As beverage cans are painted a direct laser beam impact is out of the question as it would remove some of the paint. So to get around this problem we use plasma generation (see PLASMA section) - where the plasma is generated by a CO2 laser beam.
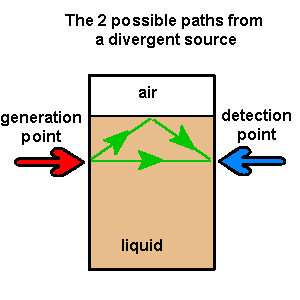
Figure 7
The schematic diagram above shows the possible ultrasonic paths from generation to detection point, ignoring any reflection from the bottom of the container or higher order reflections.
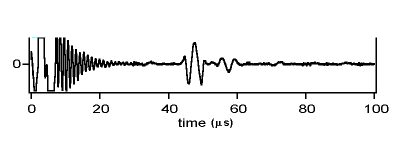
Figure 8
The waveform above shows the possible ultrasonic arrivals as outlined in figure 7. Note the first signal at around 48µs is the direct wave from generation to detection point - the preceding signal (inverted wrt the first) at around 58µs is the reflection from the top surface of the liquid-air interface.
This technique has many other potential applications where there is only access to the side of a container - to recap its strengths are that it self-calibrates (we don't need to know anything about the contents), its very accurate, and its non-contact. This technique is currently subject to world-wide patent applications - if you want any further details on this or any of the above then please get in touch with us.
