
Staff help guides for digital learning tools

Moodle
Moodle is the Warwick's Virtual Learning Environment - integrated with SITS for Module information; Mahara & EchoVideo for lecture capture and video assignments; and Talis Aspire reading lists.
Getting started
Course structure
Accessibility
Communication & collaboration
EchoVideo
EchoVideo is the University's lecture capture and video management platform. It enables you to capture, edit and share video content with your students.
There are two options available at Warwick for recording with EchoVideo: Lecture Capture and Universal Capture (Personal).
EchoVideo & Moodle
Accessibility & inclusivity
Analytics & insights

Mahara
Mahara is Warwick's ePortfolio system, allowing students and staff to evidence their learning progress over time. It can be used for assessment and is integrated into Moodle's assignment activity so teachers can set up submission points for Mahara ePortfolios.
Getting started
Find out what Mahara is and what it can be used for. This guide also covers how to log in and complete your profile information.
Adding reusable content
This guide covers how to add artefects to your portfolio including files, journals, CVs and plans.
Working with pages and collections
Once you have some content in your portfolio, you can create pages and collections. This guide shows how to create, edit, share and use tags.
Using Mahara for assessment
This guide shows how Mahara can be used in Assessment. It covers creating and using templates, commenting and peer review.
Working with groups
This guide details how to set up groups, and manage and share portfolios with groups of users.
Managing a portfolio
This guide covers key tasks to manage your content, including creating and saving snapshots of your work, how to export a portfolio and removing objectionable content.

Vevox
Vevox is a personal response system which enables staff to create engaging sessions through live polling, quizzes, and Q&A. Staff create their session through the Vevox dashboard while students use the unique session ID to connect via smartphone, tablet or laptop.
Student access to Vevox
Students do not need to have a Vevox account or license to join a session as a participant. Instead, they connect by entering the 9-digit session ID at vevox.appLink opens in a new window.
In this guide:
Video: Introducing Vevox for lecturers (02:19):
Benefits
- It is fun to use and supports active learning
- Resolve misconceptions early
- Anonymous participation removes fear of judgement and increases engagement
- Can be used across a variety of delivery methods, e.g. in person, online, and hybrid
- AI-assisted tools help you create polls and quizzes in seconds
Usage at Warwick
Vevox is used across the learning and teaching portfolio at Warwick in creative and innovative ways.
Find out how Martyn Parker from the Department of Statistics is using the LaTeX functionality in Vevox to effectively present complex mathematical notation and improve engagement for students at the Vevox blog.
Warwick has a site license for Vevox so you can access features that are not available on a free account, e.g. Q&A moderation, and star rating, text and number polls. Warwick Vevox accounts are available for staff and postgraduate research students. It uses Single Sign-On (SSO) so you can log in with your Warwick username and password.
Log in to Vevox
- Go to https://warwickuni.vevox.com/#/
- Click Login with SSO.
- Enter your University of Warwick email address using the format u1234567@live.warwick.ac.uk and click Next.
- Enter your University of Warwick password and click Sign in.
- Complete the two-factor authenticationLink opens in a new window step if prompted.
- On first access to Vevox, you will be asked to accept or reject the release of your name and email address to Vevox. Accept this step.
- You will now be signed in to Vevox and taken to your dashboard.
You can also sign up and log in from vevox.com but will be redirected to sign in with SSO if using a Warwick email address.
In this section:
- How to create a session
- Presentation
- Question types
- Quiz
- Q&A and feedback
- Surveys
- Self-paced quizzes
How to create a session
- Log in to your Vevox dashboard.
- Click Create session.
- Give your session a unique name.
- Click Create.
Once you have added content to your session and you are ready to start, don’t forget to click Start session to make your content available to students.
Presentation (Polls)
The Presentation area of the dashboard (previously called 'Polls') is where you create and manage individual questions to pose to students during a live session to check understanding, or gather feedback or opinions. Learn how to create your first poll.
Watch this short video (00:58):
Question types
- Multichoice - Participants select one or more items from a list.
- WordcloudLink opens in a new window - Displays responses in a cluster of words to form an image. The more popular the response, the bigger and bolder the word appears. In present view, results can be grouped into themes or analysed for sentiment. You can also configure a word cloud question to limit the number of responses each participant can submit.
- TextLink opens in a new window - Participants enter a text response of up to 2,000 characters.
- RankingLink opens in a new window - Participants rank choices by preference or in the correct order.
- NumericLink opens in a new window - Participants enter a number within a specified range.
- RatingLink opens in a new window - A simple 5‑star rating scale.
- XY plotLink opens in a new window - Shows the relationship between two sets of data on a scatter plot.
- Pin on imageLink opens in a new window - Participants drop up to 9 pins on an image.
- Pin on choice imageLink opens in a new window - Plots multichoice options as numbers on an image.
- LaTeX pollingLink opens in a new window - Allows mathematical or scientific notation in questions.
Quiz
Quizzes are essentially a series of polls where you have specified a correct answer for each. Please note correct answers cannot be set for rating, word cloud, and XY plot questions. Correct answers can be added or amended after a poll has already received results, which is useful if you need to make corrections mid-session.
Q&A
Q&A allows participants to submit questions, comments, and feedback, and to upvote others’ contributions. Anonymous posting can be enabled.
Self-paced (Surveys)
The Self-paced area of the dashboard (previously called 'Surveys') allows you to run a series of questions asynchronously, outside of a live session. You might use this to gather feedback, opinions, or (pre-)check knowledge. Students do not see responses from their peers.
Self-paced quizzes
Self‑paced quizzes are surveys where each question has a correct answer. Students can complete them in their own time and receive instant feedback.
How to run a session that the students can join
- In the Vevox dashboard, click on your session.
- Click Start session to make the session available for students to join.
- Share your screen with students and click Present fullscreen to display the joining instructions.
- Students should go to vevox.app on their own devices and enter the 9‑digit session ID, or scan the QR code.
Once your class is over, you can end your Vevox session in the session toolbar by clicking the 9-digit session ID and then clicking End session. You can also view how many participants have joined. Vevox allows up to 5,000 participants per session.
Please see the following video on using Vevox with PowerPoint (09:50):
How to get the PowerPoint add‑in
- Open the PowerPoint app.
- On the Home tab, click Add-ins.
- Under My add-ins, click Vevox. This will open the Vevox side-panel in PowerPoint. If Vevox does not appear automatically, search 'Vevox' in the search bar.
Once you have completed this process, a new icon labelled Insert Poll will be installed at the end of the ribbon in the Home tab, for convenient future access.
Creating and presenting polls in PowerPoint
You can either create Vevox polls directly in PowerPoint, or use existing polls you've already created in the Vevox dashboard. Please find more information at the Vevox guide to creating polls with PowerPoint.
Please also see this Vevox guide to presenting your polls in PowerPoint.
Vevox integrates directly with Microsoft Teams, allowing you to run anonymous polls, quizzes, surveys and Q&A without leaving your meeting or switching screens.
Students do not need to enter a session ID to take part in Vevox activities within MS Teams, nor do they require an additional device.
You can add Vevox to:
- Meetings and calls (for synchronous teaching)
- Channels and chats (asynchronous teaching)
Add a Vevox session in the side panel of a Teams meeting or call
- In Teams, open the calendar invitation for your meeting.
- Click Chat.
- Click the Add tab (+) icon.
- Click the Vevox tile. You can search 'Vevox' if it doesn't appear automatically.
- If you are prompted to log in, click Log in with Microsoft and log in via single sign-on. Please use your Warwick email address in u1234567@live.warwick.ac.uk format.
-
You can then link an existing Vevox session, or create a new one by clicking Create session.
When you hold your Teams meeting, click the Vevox tab in the toolbar to open the side panel.
Watch the video showing Vevox in the MS Teams side panel (06:00):
Add the Vevox tab to a Teams channel or chat
- Click the Add tab (+) icon at the top of your channel or chat window.
- Click Apps.
- Click the Vevox tile. You can search 'Vevox' if it doesn't appear automatically.
-
If you are prompted to log in, click Log in with Microsoft and log in via single sign-on. Please use your Warwick email address in the 1234567@live.warwick.ac.uk format.
- You can then link an existing Vevox session, or create a new one by clicking Create session.
How to use Vevox in Teams
Please see the Vevox help guide for more information on how to use Vevox in Teams.
Students do not need to enter a session ID to take part in Vevox activities within Moodle. The Moodle integration works best with asynchronous, self-paced activities such as surveys and quizzes.
Adding a Vevox activity to your Moodle course
- In your Moodle course, turn on Edit mode.
- In the relevant section, click the + icon, then Activity or resource.
- Select Vevox from the activity finder.
- Click Select content to open your Vevox dashboard.
- Click the relevant session.
- Select the relevant activity within the session. Your actvities are categorised under 'Polls' and 'Surveys'.
- You can then give an activity name for the students to find it on Moodle, and give a description or instructions.
- Click Save and display.
Vevox allows you to view and download the data captured during your sessions, including any results for your polling, Q&A, and survey content.
Please watch this video for an overview of Vevox data capabilities (00:49):
The data tab in a Vevox session dashboard offers the following functionalities:
Share
Create a public link so you can share the session data. Others with the link will be able to view, but not edit or download the data. If you shared the link with someone and you disable it again, they will no longer be able to view the data.
Download
Download your session data in an Excel workbook or as images (i.e. graphs).
Reset session
If you want to use your session again with a new class or audience, you can reset the session. All poll results, survey results and messages will be cleared and stored in your session history so you don't lose it.
Padlet
Padlet is an online collaboration tool best described as a digital noticeboard or interactive canvas. It enables users to create shared spaces—known as “padlets”—where they can post and organise content such as text, images, videos, links, and documents in real time.
Padlet supports a wide range of teaching, learning, and collaborative activities, from brainstorming ideas and gathering feedback to facilitating group discussions.
In this guide:
Features
- Customisable boards that support text, images, video, links, and file uploads
- Multiple layouts with over 200 templates and recipes to choose from
- A wide range of interactive features
- Flexible sharing and privacy settings
- Integrates with Moodle and MS Teams
Benefits
- Supports real time, collaborative and independent learning
- Intuitive drag and drop functionality - no technical expertise required
- Helps organise ideas visually and clearly
- Accessible across devices (desktop, tablet, mobile)
Uses
- Versatile platform - can be used for several functions
-
Changeable boards available in grid, timeline, canvas and map
- As a content bank
- For group activities
- Mapping ideas
- Hosting resources
- Collecting feedback
- For fun!
Getting started
What is Padlet?
Padlet is best described as an online noticeboard or digital canvas.
Padlet is typically used in education to facilitate collaborative activities for students, however it can also support independent study. It is a versatile platform which works well for both asynchronous and synchronous activities.
Some of the key features:
- Post a range of media, e.g. videos, images, documents, text, and links
- Contribute anonymously to most padlets
- Comment on others' posts
- React to others' posts, e.g. like, vote
- Share your padlets with others
- Customise the appearance of your own padlets
- Create your own padlets from a variety of formats, depending on the nature of the task or activity
Video introduction
Take a look at this introductory Padlet video to find out more.
Logging in to Padlet
Warwick pays for an institutional Padlet licence, so you can benefit from additional features compared with the free version. These features include unlimited usage, bigger file uploads, and additional security. Please log in via the Warwick licence using the instructions below.
Step-by-step instructions
- Go to padlet.com
- Select Log in with Microsoft.
- Enter your email address in this format: username@live.warwick.ac.uk (e.g. u1234567@live.warwick.ac.uk). You will then be redirected to Warwick's IT Services sign-in page.
- Enter your Warwick IT account username (e.g. u1234567).
- Enter your Warwick IT account password
- Complete the two-step authentication
Once you have completed this process, you will be taken to your University of Warwick Padlet dashboard.
Video tutorial
This video shows how to log in using your Warwick credentials.
Downloading and logging in to the app
The Padlet app can be downloaded from most app stores. You can find a list of compatible apps at Padlet Help.
Step-by-Step instructions
- Download the Padlet app from your app store.
- Click Log in.
- Click Log in with Microsoft.
- Enter your email address in the format u1234567@live.warwick.ac.uk, then click Next.
- Enter your Warwick IT Services password.
- If prompted, select whether to stay signed in. You will now be logged in to your Warwick Padlet account.
Padlet dashboard
The Padlet dashboard is the main hub you see when you log in to Padlet, also called the Padlet Home. From here, you can create new padlets, access padlets you have previously created, and find padlets you have been invited to collaborate on or have recently visited.
The dashboard also provides access to the Gallery, where you can browse over 200 ready-made templates (sometimes called Recipes) organised by category. If you are new to Padlet, you can explore the built-in video tutorials on the Learn tab to learn about different templates and features.
To get started, select + Make to create a padlet from scratch, or choose a template from the Gallery. You can also access your user menu from the top right of the dashboard to manage your account settings and sign out of Padlet.
For more detailed information about each area of the dashboard, see Padlet's Dashboard guide.
Video introduction
This short video gives an overview of the Padlet dashboard area.
Importing Padlets from another account
If you have previously created padlets with a free Padlet account, you can import them into your Warwick account and continue using them there.
Follow the step-by-step guidance from Padlet on how to import personal padlets.
Creating and sharing
Creating a Padlet
Creating a Padlet is quick and intuitive. From your Padlet dashboard, select Make a Padlet to create a new board. You can either start with a blank board or choose from a range of templates and recipes designed for different teaching and learning activities.
For example, you might select a template for:
- A reading list
- A video discussion board
- Brainstorming and idea generation
- Presentations
- Collecting feedback from students
Templates and recipes provide a ready-made structure that you can then customise to meet your needs, helping you create engaging activities in just a few clicks.
Padlet is flexible, you can change the layout, format, or appearance of your board at any time without losing any of the content you have already added. This makes it easy to experiment with different designs as your activity develops.
For detailed, step-by-step instructions, refer to Padlet's own guidance on creating a board from scratch.
Video introduction
This video shows how to create a wall padlet, just one of the styles of boards available.
Add content to your Padlet board
Once your Padlet board has been created, both you and your students can begin adding content.
To get started, consider adding a few example posts or some instructions to guide students on how to use the board. To create a post, either double-click anywhere on the board or select the + Post button.
Padlet supports a wide range of content types. You can easily add:
- Images
- Documents
- Links
- Videos
- Other media files
Posts can also be pinned to keep important information visible or scheduled to appear at a later date.
Students do not need a padlet account to contribute. If they post without signing in, their contribution will be displayed as Anonymous.
For more information on creating and managing posts, visit the Padlet detailed instructions on adding content to your board.
Video introduction
This short video shows how to add a post on a padlet.
Sharing your Padlet
Padlet offers a range of sharing options, making it easy to provide access to students, colleagues, or external participants. All sharing settings can be accessed from the Share menu within your padlet.
Before sharing your padlet, it is important to review the privacy settings. These determine who can view, contribute to, or edit the board, helping you ensure that access is appropriate for your intended audience.
The simplest way to share a padlet is by copying and sharing its web link. From the Share menu, select Copy link to board/sandbox and then paste the URL wherever required, such as into Moodle, an email, a Teams chat, or a webpage.
However, sharing a link is not always the most effective option. Padlet provides several ways to share content, for example by QR code. The most suitable method will depend on the type of board you have created and who you want to access it.
Padlet's guidance explains the available sharing methods, privacy options, and recommendations.
Video introduction
This video shows how to share your padlet via a link or QR code.
Padlet tools and features
While Padlet is easy to get started with, it also includes a range of simple to implement, interactive features that can help increase engagement, support different ways of learning, and provide valuable insights into how your content is being used.
Just some of the features you may wish to explore include:
- Podcasts from Padlets – transform a Padlet board into an RSS feed and create a podcast directly from your content, making it easy to share discussions, reflections, or learning resources in an audio format.
- Emoji and reaction tools – encourage quick and simple participation by allowing users to react to posts with emojis, votes, ratings, and other feedback options.
- Real-Time translation – make content more accessible by translating boards into over 40 languages, helping participants engage with content in their preferred language.
- Analytics and insights – view analytics for your padlets to better understand how your content is being accessed and interacted with, including information about audience reach and engagement.
- Post videos on a padlet - Padlet supports a variety of multimedia communication styles by allowing participants to contribute using text, images, video recordings, audio messages, screen recordings, and file uploads.
- Export options – export your padlet as a handout, PDF, image, spreadsheet, or presentation slide deck, making it easy to share content beyond the platform.
- Polls, quizzes, surveys and voting – gather opinions, check understanding, collect feedback, or facilitate decision-making through built-in interactive activities.
These tools can help you create more engaging and inclusive learning experiences while keeping participation simple and accessible.
Accessibility and guidance
Accessibility
Padlet is designed with accessibility in mind and aims to provide an inclusive experience for all users. The platform targets WCAG Level AA compliance, the internationally recognised standard for accessible digital content, and its Board product is broadly compliant with these guidelines.
Visit Padlet's accessibility guidance and Padlet Gazette, where they share updates and improvements to accessibility features. These include tools such as automatic transcription and caption generation for video and audio content uploaded to a padlet, helping to make multimedia content more accessible to a wider range of users.
Padlet's Accessibility Menu and the Accessibility FAQs give lots of guidance on how to use and implement accessibility features.
Padlet support
Padlet offers a wide range of support and guidance to help you make the most of the platform.
Padlet Gazette, the official Padlet blog, is regularly updated with the latest news, features, and platform updates.
Padlet Help is another excellent resource, providing a comprehensive knowledge base with detailed, step-by-step guidance on a variety of topics.
The Padlet YouTube channel contains a wealth of videos offering tutorials, tips, and practical guidance to support your use of Padlet.
They also host monthly Padlet Sessions webinars. You can join these live or watch the recordings at a time that suits you. During these sessions, Padlet experts share quick, practical tips and guidance, and participants have the opportunity to ask questions and learn from others.
Digital Learning support
We hope you found what you were looking for in these guides, but if not please rest assured help is still at hand. Please contact us at
Choosing an alternative to QMP
QMP is being retired and will no longer be available for assessments. All existing and new assessments must move to a supported alternative.
This page will help you choose the most appropriate replacement based on your assessment type, level of risk, and marking needs. There is no direct one‑to‑one replacement for QMP. The right option depends on what you need your assessment to do.
At a glance
- Paper-based assessment - Best for in‑person exams and handwritten responses.
- Moodle Quiz - Best for quizzes, automated marking, and large cohorts.
- Wiseflow - Best for high‑stakes digital exams and coursework with structured marking.
How to choose
Start by thinking about what matters most for your assessment:
- Is it high or low stakes?
- Do students need to handwrite answers?
- Do you need automated marking?
- Is secure online delivery required?
- How complex is the marking and moderation process?
Use the guide below to narrow your choice.
Option 1: Paper-based assessment
Paper-based assessment remains appropriate for some in‑person exams and disciplines where handwritten responses are essential.
Good fit if you need:
- Handwritten workings, calculations, or diagrams
- In‑person exam hall conditions
- Minimal reliance on digital systems
- A familiar, low‑technology approach
- Offline marking workflows
Typical use cases
- Closed‑book exams
- Essay or short‑answer questions requiring handwriting
- Assessments where digital access is not guaranteed
✅Choose paper if your assessment depends on handwriting, in‑person delivery or to limit issues around use of generative AI.
Option 2: Moodle Quiz
Moodle Quiz is well-suited to objective, auto‑marked assessments, and scales effectively to large cohorts.
Good fit if you need:
- Multiple‑choice, numeric, matching, or short‑answer questions
- Automated marking and grading
- Immediate or scheduled feedback
- Randomised questions or answers
- Integration with the Moodle gradebook
- Efficient delivery to large groups of students
- Secure online exams using the opensource Safe Exam Browser.
Typical use cases
- Formative quizzes
- Low‑stakes or mid‑module tests
- Practice and revision activities
- Knowledge‑check assessments
⚠️ Whilst Moodle Quiz may be less suitable for long essay questions or high‑stakes exams requiring enhanced security controls, it can still be used for these.
✅Choose Moodle Quiz for auto‑marked or low‑stakes online assessment.
Option 3: Wiseflow
Wiseflow is designed for high‑stakes assessment and supports secure online exams, coursework submission, and structured marking workflows.
Good fit if you need:
- Secure online exams using the Respondus safe-exam browser.
- Essay or long‑form digital answers
- A mix of question types in one assessment
- Anonymous marking
- Moderation and second marking
- External examiner access
- Coursework submission and feedback in the same system
Typical use cases
- Online exams (open or closed book)
- High‑stakes summative assessment
- Essay‑based or mixed‑format exams
- Coursework requiring structured marking and feedback
✅Choose Wiseflow for high‑stakes assessment or more complex marking workflows.
Still unsure?
If your assessment has mixed requirements or you are unsure which option fits best:
- Review your learning outcomes and assessment purpose
- Consider the level of risk and required controls
- Think about your marking and feedback workflow
Support is available for:
- Assessment design advice
- Tool‑specific guidance and training
- Educational technology consultations
Contact the Digital Learning team to discuss your requirements.
Student Module Feedback
Student Module Feedback is a key tool for improving the quality of teaching and learning by gathering students' reflections on their module experiences. It focuses on open dialogue between students and instructors, allowing both groups to highlight what works well in each module and what could benefit from improvement. This approach not only enhances academic support but also ensures that students feel heard and valued in shaping their educational environment, fostering a culture of continuous improvement across the university.
We use the Moodle Questionnaire tool to enable an easy self-service setup for Student Module Feedback. Using a template in Moodle, staff can quickly add and activate the feedback survey within their module space by following step-by-step instructions on this page.
The template includes a set of standard questions, allowing data to be aggregated across modules and departments. Students complete the survey anonymously. We recommended setting aside class time to encourage students to complete the survey to increase response rates. Module leaders also have the option to send email reminders to students who haven't yet completed the survey.
Once the survey period ends, authorised departmental staff can preview anonymised responses and download the data for use in Excel or as a standard PDF report. The standard questions are purposefully limited to encourage as many students as possible to provide their feedback and still gather sufficiently broad data.
Standard questions
The University recommends that a common set of questions be used for Student Module Feedback. This is not mandatory but it is strongly recommended and it will assist when departments need to aggregate data across programmes.
The following questions primarily use a five-point Likert scale (strongly disagree to strongly agree) for quantitative analysis, along with 2 open questions to gather some qualitative feedback. Departments can add additional questions if required.
- Please name the one thing in the module that has had the most impact on your learning (open question)
- Module content is delivered in an engaging way (strongly disagree to strongly agree)
- Feedback (on work, in class, or other forms) received on the module enhances my learning (strongly disagree to strongly agree)
- The module is well organised (strongly disagree to strongly agree)
- Appropriate support is available to me throughout the module (strongly disagree to strongly agree)
- The module offers an appropriate level of intellectual challenge (strongly disagree to strongly agree)
- Is there anything else you would like to add to your feedback? (open question)
Who can access responses
By default, anybody with a Manager, Course Leader, Editing Teacher or Non-editing teacher role in a module can see the Student Module Feedback responses by clicking on the View All Responses link within a module.Therefore, you should check the participants list before making the Student Module Feedback survey live in your module.
Permissions can be changed at the activity level to ensure that only the Manager, Course Leader or required member of staff from the department can view the results if you choose to limit access.
Student Module Feedback Process
- With editing turned on, hover the dotted line between activities and click on the + symbol, or click 'Add an activity or resource' in the topic/section where you want the Student Module Feedback questionnaire to appear.
- Choose 'Questionnaire' from the list.
- Type a name in the 'Name' field for the Questionnaire in the box.
IMPORTANT: This 'Name' will be the title of the link on the Moodle course page. We recommend using the Module code and a year identifier as this 'Name' is also what the raw data file will be named when it is downloaded. This is particularly important if you will be working with and saving multiple raw data files. - The 'Description' box can be used to display instructions, inform the student that the Student Module Feedback is anonymous, and explain how their data will be used and the time it will take.
Example wording: 'This feedback form is anonymous and will take about 5 minutes to complete. Your answers will be used to improve the delivery of this module.' - Optionally, choose to automatically 'Open' and 'Close' the Student Module Feedback questionnaire at set times by clicking on the relevant tick box and choosing a date. See Publish to Students below.
- In 'Response options', 'Type' should be 'respond once' (allowing students to only make one response), 'Respondent type' should be 'anonymous', and 'Students can view ALL responses' should be set to 'Never'.
- You can choose whether you want Moodle to send the student an email notification of their submission and whether you wish to allow students to Save and later Resume their answers. Submission grade can be ignored for the purpose of Student Module Feedback.
- Under 'Content options', choose 'Student Module Feedback Template [Student Module Feedback Original Template]' to use the standard questions. If you wish to add additional questions, please see the box 'Adding questions' below.
- Scroll to the bottom of the page and click 'Save and return to course', or 'Save and display' to be able to preview the questionnaire.
When will the survey become available?
The survey will either become available to students as soon as it is saved or on the start date if this has been added.
How can I ensure students complete the form?
When the survey goes live, the recommended approach is to put aside five minutes in a taught session to ask students to complete the survey during the session. You can also share the steps opposite which demonstrates how to complete an example feedback form.
This will improve the response rate and ensure that support is available to students in filling out the survey and interpreting the questions.
Moodle also makes it possible to contact non-respondents without compromising their anonymity and remind them to answer the questionnaire.
Accessing responses
As soon as the questionnaire has received responses the module leader can preview responses, download feedback as a file, and email a reminder to non-respondents without compromising their anonymity.
View responses to the questionnaire
From the Moodle course page click the Student Module Feedback questionnaire link and then click the 'View All Responses' link in the menu.
A summary of responses will be shown alongside links for contacting non-respondents and downloading the responses.
You can see individual responses by clicking on 'List of responses' in the menu.
Export the data
Export the results of the questionnaire by clicking on View All Responses, and then on Download.
Responses can be downloaded in multiple formats including .csv, .xlsx and .pdf. Each row in the exported data contains a field for: Submitted on (date time), Institution, Department, Course, ID (user ID), Full name, Username, and each question. We recommend using .csv to prevent issues with numbers formatting as text.
Download the responses as a standard PDF report
- Click on View All Responses
- Find the text: Visible groups: All participants
- Click on the PDF icon.
- This will allow you to download or open a PDF of the results
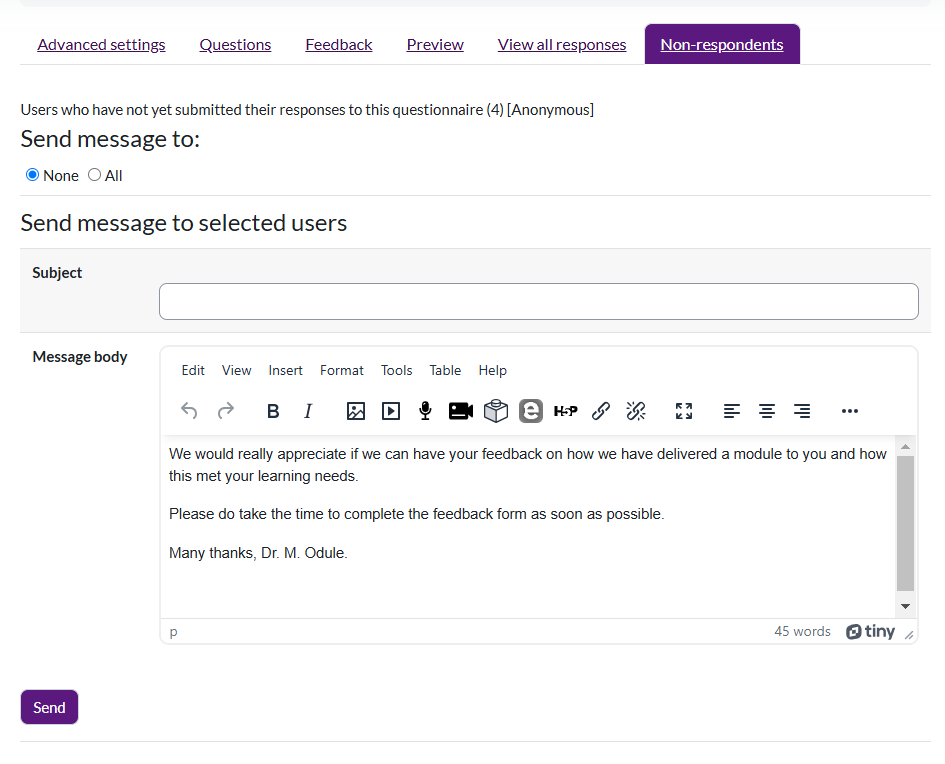
Contacting non-respondents
Encourage non-respondents to complete the Student Module Feedback by emailing them. This will help if you are not asking students to complete the feedback form in class.
- Click the 'Non-respondents' tab
- Select All next to Send message
- Type a subject line and the required message
- Click 'Send' button at the bottom of the page.
Add additional questions
Departments can optionally add additional questions to the questionnaireLink opens in a new window.
- To add a text collection question, use the 'Essay Box' question type.
- For rating questions (i.e. Strongly Disagree to Strongly Agree), use the 'Rate Scale (1...5)' type. In the quick view report, this option displays an average out of 5 and the count/percentage of responses per choice. Additionally, this type exports data as numerical values for easier calculation and reporting.
Note: Other types, such as Dropdown Box and Radio Buttons, do not show a numerical average, and responses are exported as text (e.g., Strongly Disagree to Strongly Agree) which can make reporting more difficult.
To add a new question to your questionnaire:
- Click on the link to the questionnaire from your course page.
- Click on Questions and scroll to Add Questions.
- Choose the question type from the drop-down list and click 'Add selected question type'.
- Choose from one of the following options:
Add an Essay questionLink opens in a new window
- Give the question a descriptive name for easy reference in the data download (this won't be visible to participants).
- Set whether a response is required.
- Select 'Plain text' as the response format.
- Leave the input box size at the default of 5 lines (adjustable later if needed).
- Enter the question text.
- Click 'Save changes' at the bottom.
Add a Rate (scale 1...5) questionLink opens in a new window
The Rate (scale 1...5) question can be set up with descriptive labels
(like Strongly Disagree to Strongly Agree). This question type provides a numerical average in reports and raw data files, allowing for advanced analysis.
To set up with labels:
- Add a descriptive 'Question Name' (for data download reference only).
- Choose whether a response is required.
- Enter the number of scale items (default is 5).
- Type the question text.
- In 'Possible answers,' enter each number, followed by = and the label (e.g., 1=Strongly Disagree).
To set up with numbered ratings:
- Add a 'Question Name' (for your reference).
- Set if a response is required.
- Enter the scale items (default is 5).
- Add question text or instructions in the 'Question Text' box.
- Click 'Save changes.'
RapidMooc green screen studios
Rapidmoocs, located at Westwood, Central Campus and GIbbet Hill, allow for the easy and instant creation of videos for blended learning, training, projects, demonstrations, interviews and more.
Podcasting
Learn how to record podcasts in the RapidMooc Studio.
Miro
Miro is an online whiteboard with built-in templates that enables collaborative working between staff and students.
Digital Learning super user guide
A guide to Digital Learning tools at Warwick for super users such as Academic Technologists and those in similar roles.