
STSS Robot Lab
Please get into pairs for this lab. Pair Programming is a recognised software development technique. One
of you, the driver, will write code while the other, the navigator, should review each line of code as it is typed to spot any mistakes. Common mistakes include spelling errors or forgetting to put an ; at the end of the line. This also means there are two of you to discuss how to approach the tasks.
In this lab, we will be using a combination of Processing and Lego NXT robots to implement some of the concepts you have been learning about in the lecture.
Processing is built on top of the Java programming language. It is an open source environment for people who want to program images, animation and sound. We are going to be using it to simulate a robot, as it explores a maze, building up a representation of the environment using an occupancy grid. You will find the Processing Reference and a number of useful tutorials here.
Once the robot has found the goal and has built a representation of the environment, you will be able to input the waypoint coordinates for the robot to find the fastest way back out of the maze. To program the robots, we will be using leJOS NXJ, this allows us to program the Lego NXT robots also using Java. You will find the API and a number of useful tutorials here.
This is similar to the Search and Rescue effort deployed in the event of a disaster where timely discovery of victims is of utmost importance.
Step 1: Building the map
Your robot is part of a search and rescue mission. It needs to get to the victims located at the Goal. Once it has found the victims, it should lead them to safety via the fastest route.
Extract Maze.zip and open it in Processing.
When you press the green triangle in the top left hand corner you should see an image like the one below:
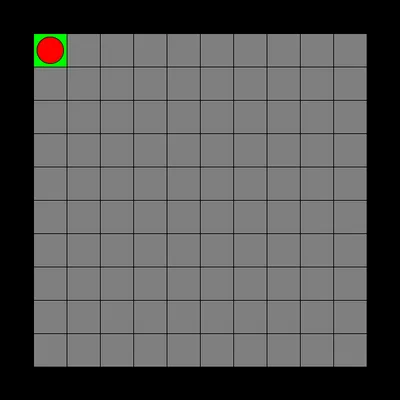
This represents the maze using an occupancy grid that is 12 cells by 12 cells. The size of the cells is set in the code to 600/12 = 50 pixels; what this corresponds to in the real world is up to you (note the width of the real robot is approx 20cm).
The maze is represented by a 2-dimensional array of integers, called maze, with each integer value encoding information about the cell
- To begin with, you do not know whether a cell is occupied by a wall/obstacle or not. This is represented as a 4 in the code and drawn as a grey cell.
- A wall surrounds the maze, this is represented by a 1 in the code and drawn as black cells.
- Your entry point is cell (1, 1). This is represented by a 2 in the code and drawn as a green cell. Note that the coordinate system for pixels in a computer window is reversed along the y axis when compared with how you draw a graph. (0,0) is in the top left.
![]()
- The goal cell is represented by a 3 in the code and drawn as a red cell - you do not know where this cell is until you find it.
- Once you have established that a cell is not occupied it is represented as a 0 in the code and drawn as a white cell.
- The robot is drawn as a red circle at cell (1,1).
The initial maze array therefore looks like this:
maze = {
     {1,1,1,1,1,1,1,1,1,1,1,1},
     {1,2,4,4,4,4,4,4,4,4,4,1},
     {1,4,4,4,4,4,4,4,4,4,4,1},
     {1,4,4,4,4,4,4,4,4,4,4,1},
     {1,4,4,4,4,4,4,4,4,4,4,1},
     {1,4,4,4,4,4,4,4,4,4,4,1},
     {1,4,4,4,4,4,4,4,4,4,4,1},
     {1,4,4,4,4,4,4,4,4,4,4,1},
     {1,4,4,4,4,4,4,4,4,4,4,1},
     {1,4,4,4,4,4,4,4,4,4,4,1},
     {1,4,4,4,4,4,4,4,4,4,4,1},
     {1,1,1,1,1,1,1,1,1,1,1,1}
  };
It is your job to explore the maze and update the maze array.
The code is split into three parts:
- The Robot class - this defines a robot and provides some useful methods (see below)
- Maze - this is where the main control loop of our program is
- The Library Class - we have written some helper functions here - you do not need to look at this
The Robot Class
The robot is created with a current_x and current_y position.
This class also contain some useful methods:
int[] checkNeighbours(int current_x, int current_y) {
    return lib.checkNeighbours(current_x, current_y);
  }
int[] checkNeighbours(int current_x, int current_y) takes in the current cell position and checks neighbours to the North(N), South(S), East(E) and West(W) by referring to a reference map stored in the library. This is simulating taking in data using e.g. a range sensor such as a sonar or lidar.
It returns an array representing the neighbours to the N, S, E and W, e.g. {0,0,0,0} would mean that all neighbouring cells are empty, {2,0,1,3} would mean that the cell to the North is the Starting Cell, the cell to the South is empty, the cell to the East is occupied and the cell to the West is the Goal.
There is also a method which first checks that the robot is able to move north then instructs it to do so. It does this by checking the neightbours of the current cell and then checking that the first element in that array, [0], is not equal to 1 (its the ! that makes the check NOT equal to, rather than equal to). If the element is not equal to 1 then we can move north by subtracting y from the current element, current_y -= 1:
void moveNorth() {
    if (!(lib.checkNeighbours(current_x, current_y)[0] == 1))
      current_y -= 1;
  }
The final method is used to draw the robot.
void draw() {
    fill(255, 0, 0);
    ellipse(robot.current_x*cellWidth+cellWidth/2, robot.current_y*cellWidth+cellWidth/2, cellWidth-10, cellWidth-10);
  }
EX1 Write the methods that will move the robot South, East and West
Maze
This code contains 4 functions:
void setup()- the code here sets up the canvas and creates a 12*12 array to store the maze representation. The cells around the edge are set to 1 (occupied), the internal cells are set to 4 (unknown) and the starting cell is defined as cell (1,1). This code is run once at the beginning of the program.void draw()- this code is run many times per second (in this case 10x as we set this usingframeRate(10)in setup()). Currently it draws the maze and the robot.void drawMaze()- used to draw the maze, colouring the cells according to:
- Case 0 - cell is empty, draw a white cell.
- Case 1 - cell is occupied, draw a black cell.
- Case 2 - starting cell - draw a green cell.
- Case 3 - goal cell - draw a red cell.
- Case 4 - cell type unknown, draw a grey cell.
void keyPressed()- used to get a .png output of the current frame.
EX2 Write the code that:
-
Checks the neighbours at the robot's current location and stores them in an array called neighbours - hint
-
Uses those values to update your representation of the environment (maze[ ][ ]) - hint
-
Moves the robot to a new valid position so that it explores the maze - hint
Once you have visualised a path from the start to the goal, you are ready to move onto step 2.
Step 2: Moving the robot
Your robot has 2 motors connected to the output ports. Communication with the robot is performed over a USB connection, where you can transfer your code to the robot.
Suppose our robot wants to get from a starting point in the Cartesian space to an end point. Programming the robot to travel from one location to a goal location is usually more complicated than just moving in a straight line as there are usually obstacles that lie in the way.
Commonly, a robot will build a map (a representation of the environment) using sensors such as a camera, sonar or lidar. From the map, the robot will do path planning from which it will extract a route. This is often in the form of waypoints (two points with a traversable connection between). This means we can extract from the occupancy grid a topological map of waypoints like in the image below.

In reality it is more complicated than that as the robot needs a map to localise and needs a location to build a map - solving the problem is known as Simultaneous Location and Mapping (SLAM).
You have already built a map of the maze in Step 1. Now you just need to identify the waypoints to take your robot from the Start to the Goal.
When programming Lego robots a 2-dimensional Cartesian coordinate system is used to describe locations. The coordinate system keeps track of two numbers, an x-Position and a y-Position. The units used will be set when you setup the robot but let's assume cm. Note that the coordinate system is now not reversed, (0, 0) is assumed to be the bottom left.
Download and extract robotLabSkeleton.zip. Add the folder as a new Project in Atom.
This code is split into two parts:
- The Robot class - in Robot.java
- The Main class - in RobotLab.java
The Robot Class
The Robot class (in Robot.java) is used to set up the robot. There are a number of classes in LeJOS that make communicating with the robot easy for us.
- The
DifferentialPilotclass uses the motors to control rotation and travel. In the Robot class we create a new Differential pilot by providing the wheelDiameter, the trackWidth, the left motor port, and the right motor port. We also set a rotation and travel speed.
DifferentialPilot pilot = new DifferentialPilot(5.0, 17.5, Motor.A, Motor.C);
//parameters (wheelDiameter, trackWidth, left motor port, right motor port)
//wheelDiameter - Diameter of the tire, in any convenient units
//trackWidth - Distance between center of right tire and center of left tire, in same units as wheelDiameter

pilot.setTravelSpeed(30); // cm per second
pilot.setRotateSpeed(45); // degrees per second
- The
Navigatorclass uses aDifferentialPilotto move the robot through a path on a plane. Example of use of some common methods:
Navigator navbot = new Navigator(pilot);
navbot.goTo(xPos, yPos);
navbot.waitForStop() //Waits for the robot to stop
goTo()is a non-blocking method which means it will return immediately so you need to give your robot time to get to its destination. We have packaged two commands together to create a method,moveTo(int x, int y)that will instruct the robot to move to a waypoint and wait for it to get there
  public void moveTo(int x, int y) {
    navbot.goTo(x, y);
    while(navbot.isMoving()){}
}- The
Buttonclass allows us to interact with the buttons on the robot
Button.waitForPress(); //wait for some button to be pressed
- The
LCDclass allows us to print to the robots LCD screen
LCD.clear(); // clears the LCD
LCD.drawInt(Int int, int x, int y); // print an integer on the LCD at coordinate x, y;
LCD.drawString(String string, int x, int y); // print a text string on the LCD at coordinate x, y;
The Main Class
The Main class (in RobotLab.java) is where you will write the code to move the robot.
EX3 With the help of the above navigate your robot back through the maze.
Extension
If you finish early you may wish to think of further improvements. In particular you may wish ways that make your exploration of the maze more efficient.