
Lab 4
This lab will give you an introduction to JS-EDEN, the web variant of tkeden. The tasks in the lab assume a little bit of EDEN knowledge already.
Starting JS-EDEN
There are several flavours of JS-EDEN that are linked from the Empirical Modelling web pages. In this lab, we will use the Emile flavour, available at:
http://jseden.dcs.warwick.ac.uk/emile/
Disclaimer: JS-EDEN is a "work in progress" so be aware that some/all models have bugs/problems.
The first thing that you will probably notice is the EDEN Interpreter Window. This is perhaps the only familiar part of the interface if you have come from tkeden.
Let's see what happens when we create an observable and a dependency, so type in:
a is 5;
b is a * a;
In tkeden we would use the query command (?) to inspect the value of b, but in JS-EDEN you can view the values of all observables in the left hand panel:
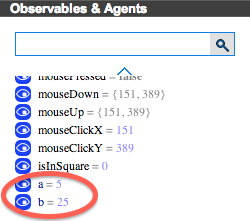
So one of the differences with JS-EDEN is there is no output window.
Change the value of the observable "a" to convince yourself that JS-EDEN is a dependency maintainer.
Canvas
The next thing you might notice is the "Canvas" page that is currently an empty white space. This will be the main focus of our exploration today.
In tkeden, you might already be familiar with DoNaLD which is a line drawing notation and SCOUT which is a UI notation. There is no DoNaLD and SCOUT in JS-EDEN. Instead, there are some "drawable" type observables that you can use as part of the EDEN notation (Ant: So I think you only need one notation!).
To add a line:
myLine is Line(0,0,50,100);
picture is [myLine];
The first line creates the line observable, with the parameters x1, y1, x2, y2 representing the two points between which the straight line is drawn.
The second line defines the picture observable as a list containing the line observable. The picture observable represents the canvas. (Without this, you would not see the line in the Canvas page of your browser.)
Modify the line:
myLine is Line(10,100,10+a,100);
Now the line is dependent on the value of the observable "a".
Line colour:
col is "red";
myLine is Line(10,100,10+a,100,col);
JS-EDEN has the same fluid interactive model-building style as tkeden. You are free to define and redefine observables whenever you like.
Mouse observables
Take a look at the Observables panel again. "Woh, there is some stuff in there I didn't write!" Yes, for example, "mouseX" and "mouseY" are 2 observables that are provided by JS-EDEN and they correspond to the mouse pointer position in the canvas. Try this:
myLine is Line(0,0,mouseX,mouseY);
There are another 2 observables for the last position of the mouse click ("mouseClickX"), and another observable for the current state of the mouse ("mousePressed").
1. Can you modify the line so that the start point of the line is the position of the last mouse click?
2. Can you make the line turn red when the mouse button is being pressed?
(Hint: In JS-EDEN, as in tkeden, you can write "inline if" expressions of the form [bool] ? [true_value] : [false_value].)
Shapes
There are several different shape type observables you can create.
To make a circle:
myCircle is Circle(100,100,50);
The minimum parameters for a Circle consist of x, y, radius. Then add it to the picture observable:
picture is [myLine, myCircle];
There are 2 optional parameters for Circle: fill colour and outline colour. Try this:
myCircle is Circle(mouseClickX, mouseClickY, 50, "orange", "black");
Task: Draw a vertical line down the middle of the canvas. If the user moves the circle to the left side of the browser then it should show a yellow circle. If they move to the right then it should be a green circle.
To make a rectangle:
myRect is Rectangle(20,20,220,100);
You will also need to add the rectangle to the canvas ("picture is [...]"). The minimum parameters for a rectangle are x1, y1, x2, y2. Rectangle has 2 optional parameters which are similar to the Circle properties: fill colour and outline colour.
Triggered actions
In the above examples we were working with dependencies. A "triggered action" (also known as a triggered procedure) is a common EDEN construct and it is also available in JS-EDEN:
proc myTrigger : observable {
   // the observable has changed
}
Consider the rectangle and the circle again:
rectFill = "clear";
myRect is Rectangle(20,20,220,200,rectFill,"black");
myCircle is Circle(mouseClickX,mouseClickY,50,"orange","black");
picture is [myRect,myCircle];
Task: Create a new observable called isInRectangle which is true if and only if the circle is inside the rectangle. Then write a triggered action that changes the rectFill to "red" when isInRectangle is true.
Hint: You can access the coordinates of the rectange as follows:
isInRectangle is myCircle.x > myRect.x1 && ...
Text and Divs
There are 2 types of observable for putting text on the canvas. The first is Text:
myText is Text("Hello",50,50,"red");
Parameters: text, x, y, text colour.
Task: Take a look at the Number Line model. There is not much dependency for the lines and text (for example, if you change the length of the number line then the other lines and text labels are in the wrong position. Create a new number line model and add dependency between lines and text such that the line length can be changed. (View the script for Number Line: http://jseden.dcs.warwick.ac.uk/emile/models/numberLine/numberLine.jse)
The Text observable is for simple labels. For richer text there is the Div:
myDiv is Div("myDiv", 0, 100, 300, 200, "<h1>Title</h1><p>Some text</p>", "");
Parameters: name, x, y, width, height, html, style.
(Ant: The style parameter is still a mystery for me!)
Buttons and Sliders
With Text and Divs we started moving away from drawing towards user interface components. Here are some others.
To create a button:
myButton is Button("myButton","Press me",50,300,true);
Parameters: name, text, x, y, enabled
The first parameter name is required because when there is user interaction with a button then it will update an observable. In the above example, the name is "myButton" and so when the user clicks the button there is an observable "myButton_clicked" that is updated. This means we can write a trigger:
proc myButtonAction : myButton_clicked {
   myText = Text("Button was clicked",50,50,"red");
}
To create a slider:
mySlider is Slider("mySlider",0,200,1,0,0,10,400);
Parameters: name, min, max, step, value, orientation, x, y
After adding the slider to the canvas, move the slider and take a look at the observables panel. You should see "mySlider_value" being updated as you move the slider.
Task: Create a circle whose radius is dependent on the value of a slider. Or, more difficult, create a line where the direction is dependent on a slider that ranges from 0 to 360 (degrees).
Other drawables
There are other drawable observable types and you can find out their names and parameters from the Drawable panel on the left:
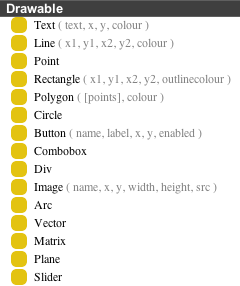
Some of these are special to Emile (e.g. Vector, Matrix, Plane). Others might take some experimentation to find out what they do.
Injecting Javascript
The final thing to mention is that JS-EDEN is of course built on Javascript and therefore it is possible to access the underlying Javascript engine (and hence the full DOM!) from your EDEN script. For a simple example, let's insert some Javascript into a triggered action:
proc myButtonAction : myButton_clicked {
   myText = Text("Button was clicked",50,50,"red");
   ${{
      alert("Button was clicked");
   }}$;
}
The code inside ${{ }}$ is Javascript.
Next Steps
Take a look at some of the JS-EDEN models already available. What types of observable do they use? How are they using dependency and triggered actions? (Ant: it is possible to download the scripts behind the models by exploring http://jseden.dcs.warwick.ac.uk/emile/models/)