
Lab 3 - Introducing JS-EDEN
This lab will give you an introduction to JS-EDEN, a web variant of tkeden originally developed by Tim Monks in his MSc dissertation1. The tasks in the lab assume a little bit of EDEN knowledge already.
Flavours of JS-EDEN
There are several flavours of JS-EDEN. They include the canvas flavour developed by Antony Harfield for use in schools and the emile flavour which was used for CS405 in 2012-13. Both these flavours have a basic underlying interface that, like desktop EDEN, cannot be reconfigured by the modeller2. For the canvas flavour, this interface is very simple, comprising an input window, a canvas and an inventory of observables, laid out in a fixed format.
In this lab, we will use the master flavour, available at:
http://jseden.dcs.warwick.ac.uk/master/
The motivating idea behind the master flavour is that the model-builder may wish to adapt the interface to the modelling tool interactively - something which is in principle supported in its current implementation. For instance, the design of the master allows the characteristic components of the interface themselves to be configured using Empirical Modelling principles. Interface components such as canvas windows, JS-EDEN input windows, symbol viewers, history and html windows exist as plugins. Once a plugin has been introduced, many instances can then be deployed, and these can be disposed on the screen by integrating their key observables (position, width, height etc) into the model under construction. There is also the potential for adding new plugins to suit specific applications, and for customising the interface to particular classes of users (cf. the design of the canvas and emile flavours). In these respects, JS-EDEN master may be seen - at least in aspiration - as more of an instrument than a tool for EM.
Starting JS-EDEN
Disclaimer: JS-EDEN is a "work in progress" so be aware that some/all models have limitations/bugs/problems. The master variant has fewer known bugs than emile, but also has more features yet-to-be-fully-implemented.
The first thing that you will probably notice is the EDEN Interpreter Window. This is perhaps the only familiar part of the interface if you have come from tkeden.
Let's see what happens when we create an observable and a dependency, so type in:
b is a * a;
a = 5;
In tkeden we might use the writeln() command to inspect the value of b, but there is no counterpart of the EDEN output window. The ouput of the command
writeln(b);
is displayed in the middle of the toolbar at the top of the master display, and this is convenient for single line output. There is no similar direct means of displaying the result of a query (?)3.
To monitor the values and definitions of JS-EDEN observables, a different technique is used. If you install the Symbol Viewer plugin via the Plugins menu, you can then bring up a window to display observables together with their current values by selecting Observable List under the Views menu:
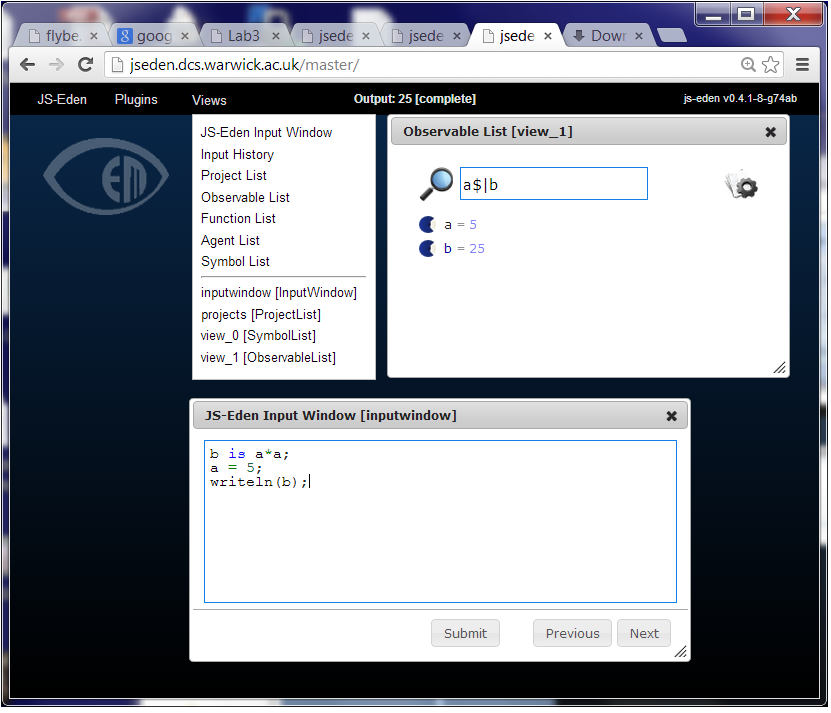
As shown in the screenshot above, the list of observables currently displayed can be selected by typing in a regular expression (RE) into the box at the top of the Observable List panel. The observables whose names match the specified RE are displayed together with their current values4. (Different aspects of the structure of a construal can be explored concurrently by creating several Observable Lists and entering a different RE into each one.)
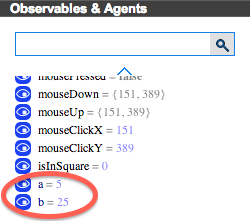
Change the value of the observable "a" to convince yourself that JS-EDEN is a dependency maintainer.
Canvas
The main focus of our exploration today will be on setting up a 'canvas' on the master display. To create a canvas, you should first install the Canvas HTML5 plugin via the Plugins menu, then add a canvas via the Views menu. A "Canvas" page should then appear as an empty white space.
In tkeden, you might already be familiar with DoNaLD which is a line drawing notation and SCOUT which is a UI notation. There is no DoNaLD and SCOUT in JS-EDEN. Instead, there are some "drawable" type observables that you can use as part of the EDEN notation5. Provided that the Canvas HTML5 plugin has been loaded, drawable observables will appear in a default canvas whose content is specified as a list using the special picture observable (cf. the Scout screen in tkeden) so you will not in fact need to explicitly create a canvas from the Views menu.
To add a line:
myLine is Line(0,0,50,100);
picture is [myLine];
The first line creates the line observable, with the parameters x1, y1, x2, y2 representing the two points between which the straight line is drawn.
The second line defines the picture observable as a list containing the line observable. The picture observable determines the content of the canvas. (Without this, you would not see the line in the Canvas page of your browser.)
Modify the line:
myLine is Line(10,100,10+a,100);
Now the line is dependent on the value of the observable "a".
Line colour:
col is "red";
myLine is Line(10,100,10+a,100,col);
JS-EDEN has the same fluid interactive model-building style as tkeden. You are free to define and redefine observables whenever you like.
Mouse observables
Take a look at the Observables panel again. "Woh, there is some stuff in there I didn't write!" Yes, for example, "mouseX" and "mouseY" are 2 observables that are provided by JS-EDEN and they correspond to the mouse pointer position in the canvas. Try this:
myLine is Line(0,0,mouseX,mouseY);
There are another 2 observables for the last position of the mouse click ("mouseClickX"), and another observable for the current state of the mouse ("mousePressed").
1. Can you modify the line so that the start point of the line is the position of the last mouse click?
2. Can you make the line turn red when the mouse button is being pressed?
(Hint: In JS-EDEN, as in tkeden, you can write "inline if" expressions of the form [bool] ? [true_value] : [false_value]. It may be necessary to enclose the bool component within round brackets.)
Shapes
There are several different shape type observables you can create.
To make a circle:
myCircle is Circle(100,100,50);
The minimum parameters for a Circle consist of x, y, radius. Then add it to the picture observable:
picture is [myLine, myCircle];
There are 2 optional parameters for Circle: fill colour and outline colour. Try this:
myCircle is Circle(mouseClickX, mouseClickY, 50, "orange", "black");
Task: Draw a vertical line down the middle of the canvas. If the user moves the circle to the left side of the browser then it should show a yellow circle. If they move to the right then it should be a green circle.
To make a rectangle:
myRect is Rectangle(20,20,220,100);
You will also need to add the rectangle to the canvas ("picture is [...]"). The minimum parameters for a rectangle are x1, y1, x2, y2. Rectangle has 2 optional parameters which are similar to the Circle properties: fill colour and outline colour.
Triggered actions
In the above examples we were working with dependencies. A "triggered action" (also known as a triggered procedure) is a common EDEN construct and it is also available in JS-EDEN:
proc myTrigger : observable {
   ## the observable has changed
}
Consider the rectangle and the circle again:
rectFill = "clear";
myRect is Rectangle(20,20,220,200,rectFill,"black");
myCircle is Circle(mouseClickX,mouseClickY,50,"orange","black");
picture is [myRect,myCircle];
Task: Create a new observable called isInRectangle which is true if and only if the circle is inside the rectangle. Then write a triggered action that changes the rectFill to "red" when isInRectangle is true.
Hint: You can access the coordinates of the rectange as follows:
isInRectangle is myCircle.x > myRect.x1 && ..
Combining triggered actions with definitions allows you to create more complex interactive behaviours.
Task: Write a triggered action such that one end of myLine follows the mouse when it is being pressed, but stays fixed when the mouse is released.
Text and Divs
There are 2 types of observable for putting text on the canvas. The first is Text:
myText is Text("Hello",50,50,"red");
Parameters: text, x, y, text colour.
Task: Take a look at the Number Line model6. There is not much dependency for the lines and text (for example, if you change the length of the number line then the other lines and text labels are in the wrong position. Create a new number line model and add dependency between lines and text such that the line length can be changed. (View the script for Number Line at: http://jseden.dcs.warwick.ac.uk/master/models/numberLine/numberLine.jse)
The Text observable is for simple labels. For richer text there is the Div:
myDiv is Div("myDiv", 0, 100, 300, 200, "<h1>Title</h1><p>Some text</p>", "");
Parameters: name, x, y, width, height, html, style7.
Buttons and Sliders
With Text and Divs we started moving away from drawing towards user interface components. Here are some others.
To create a button:
myButton is Button("myButton","Press me",50,300,true);
Parameters: name, text, x, y, enabled
The first parameter name is required because when there is user interaction with a button then it will update an observable. In the above example, the name is "myButton" and so when the user clicks the button there is an observable "myButton_clicked" that is updated. This means we can write a trigger:
proc myButtonAction : myButton_clicked {
   myText = Text("Button was clicked",50,50,"red");
}
To create a slider:
mySlider is Slider("mySlider",0,200,1,0,0,10,400);
Parameters: name, min, max, step, value, orientation, x, y
After adding the slider to the canvas, move the slider and take a look at the observables panel. You should see "mySlider_value" being updated as you move the slider.
Task: Create a circle whose radius is dependent on the value of a slider. Or, more difficult, create a line where the direction is dependent on a slider that ranges from 0 to 360 (degrees).
Other drawables
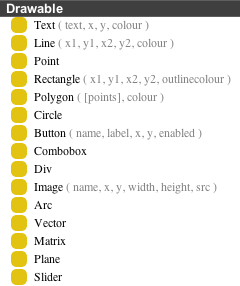
There are other drawable observable types and you can find out their names and parameters by inspecting the Function List panel that can be created via the Views menu. Sometimes the functionality will be clear from the name, but in some cases it might take some experimentation to find out what they do8. Some of these types (e.g. Vector, Matrix, Plane) were introduced especially for Emile, which was first deployed in a project on learning fundamental concepts of linear algebra. They have been inherited by the current version of master, but it would be more desirable - and in keeping with the design of master - if they were to be made available as required via a plugin.
Injecting Javascript
The final thing to mention is that JS-EDEN is of course built on Javascript and therefore it is possible to access the underlying Javascript engine (and hence the full DOM!) from your EDEN script. For a simple example, let's insert some Javascript into a triggered action:
proc myButtonAction : myButton_clicked {
   myText = Text("Button was clicked",50,50,"red");
   ${{
      alert("Button was clicked");
   }}$;
}
The code inside ${{ }}$ is Javascript.
Next Steps
Take a look at some of the JS-EDEN models already available. What types of observable do they use? How are they using dependency and triggered actions? Note that it is possible to download the scripts behind the models by exploring http://jseden.dcs.warwick.ac.uk/master/models/
You may also like to try to emulate the emile and canvas flavours of JS-EDEN by specialising the master interface. Note that an invocation such as
http://jseden.dcs.warwick.ac.uk/master/blank.html?p=InputWindow&v=InputWindow
can be used to set up an instance of master with specific plugins and views already in place (cf. supplementary note 6 in the RH panel). Observables such as _view_view_0_position and _view_inputwindow_width can then be used to configure views on the display.
Appendix
Code you can introduce to prevent accidental navigation away from the JS-EDEN interpreter webpage:
${{

var workIsDone = false;
window.onbeforeunload = confirmBrowseAway;

function confirmBrowseAway()
{
if (!workIsDone) {
return "Are you sure? If you leave this page now, your work will NOT be saved.";
}
};

}}$;
Some general advice
During this lab, you will need to take care not to inadvertently refresh or leave the browser page in which JS-EDEN is running, as your work will be lost. One way to prevent this happening is to enter the code listed in the Appenidx to the labsheet into the JS-EDEN Input Window.
Supplementary notes
1. The slides from a guest lecture about JS-EDEN given by Tim Monks in 2012-13 can be found here.
2. Links to the emile and canvas flavours of JS-EDEN can be found here. This lab is based on Lab 4 from 2012-13. Problems arising from the use of emile in the lab - and useful workarounds - were the subject of the first part of Lab 5.
3. The results of a complex writeln() or query can be accessed in a somewhat cryptic form via the Chrome console - this can be toggled on and off using ShiftCtrl-J.
4. The counterpart feature in emile can be displayed in the LH panel of the interface, as follows:
In emile, by using the mouse in various ways, it is possible to display and edit the definitions of observables. This feature is yet to be implemented in master.
5. Antony Harfield, who prepared and presented Lab 4 last year, observed at this point: "So I think you only need one notation!" This is a point of view that appeals to many modellers who have wrestled with the messy mix of definitive notations in tkeden. But perhaps this viewpoint has something in common with that of the highbrow classical musician who favours the pure sound of a string quartet over the cacophony of a symphony orchestra. The comparison between JS-EDEN and Web EDEN is interesting in this connection.
6. This can be done by opening a new instance of master in another tab, appending the query string parameter:
?p=CanvasHTML5
to the web address, loading the page, and selecting the Number Line model from the Project List.
7. Specifying style is a subject that requires further exploration - and perhaps even implementation. As Ant observed at this point: "The style parameter is still a mystery for me!"
8. The emile interface includes a panel devoted to Drawable elements, thus:
Developing JS-EDEN
Should you be interested in contributing to the open-source development of JS-EDEN (possibly even as part of your coursework for the module), please let Jonny Foss or Meurig Beynon know. Full details of how to set up JS-EDEN master to run in a virtual environment on your local machine, and of the github repository that hosts JS-EDEN development are available here.