Skip to main content Skip to navigation

Getting started with Echo360 Lecture Capture

This guide summarises the steps to get started with Echo360 Lecture Capture including the available recording options, and what to expect in lecture capture-enabled spaces. Please browse or search the Echo360 guides, or email lecturecapture at warwick dot ac dot uk for more detailed advice, training and support.

Three steps to start capturing lectures

Step One - Submit your consent form

A schedule cannot be created unless a consent form has been submitted.

You are only required to submit this form once.

    Step Two - Schedule your recordings

    Check the room booking details are correct for module recordings.

    Complete the recording booking form.

    Step Three - Deliver your session

    Recording will begin automatically.

    Wear the microphone provided in the room.

    You can manually change what is being recorded in some rooms.

    The sections below contain information about each of these steps. If you are unfamiliar with lecture capture at Warwick, please read through them.

    Live lecture capture in teaching rooms at Warwick is covered by an opt-in consent policy. Student recordings (and use of lecture captures), whether created in teaching rooms, or online, are covered by a recording and re-use policy. For information on these, visit the Education Policy and Quality website.

    Lecture Capture at Warwick is an opt-in policy whereby you consent to be recorded and have your recording published. A schedule cannot be created unless a consent form has been submitted. You are only required to submit this form once.

    Whether the request is for an individual recording with multiple presenters, or for a module taught by more than one member of Academic staff, it is essential that consent is given by all speakers who are to be recorded.

    • Other Warwick staff members presenting must complete the consent form (or these sessions excluded when requesting a module or event be recorded).
    • For external guest speakers and students, you should ensure you have a written copy of their consent (for example an email) before you request a recording.
    Lecture capture scheduling for modules relies heavily on Central Timetabling data. Please ensure that your event is accurately recorded in the timetabling / room booking system and reflects the recordings required as much as is practicable. Please contact lecturecapture at warwick dot ac dot uk to discuss this with our team if you would like more information.

    Before requesting your recording schedule:

    • Read the Schedule a lecture capture guide. This has detailed instructions for completing the booking form for different event types.
    • Check that the room you will be using is equipped to capture lectures and other events
    • Ensure that all Warwick presenters have completed the consent form and external speakers have given written consent to the organiser.
    • Read through the Recording Options section below to choose the type of recording. NB The default 'presentation only' is a recording of whatever appears on the projector and the room audio.
    • For modules, check that the timetable data correctly reflects the event details.
    • Lecture capture can be set to record sections of a longer event if required and very long events should be broken up into shorter sections where possible.

    You can choose your recording options in advance when booking, these will vary depending on the room you are using. Audio is always recorded regardless of the option chosen.

    Record 1 screen and audio of presenter [Presentation only]

    By default, this option will record your presentation and your voice. Everything shown on the lecture theatre projector(s) is recorded. You will need to use the radio mic provided. This is the most common type of recording.

    The final lecture recording may look like this:

    Screenshot of a presentation

    Record 2 screens and audio or presenter [Presentation | Other]

    This is similar to the presentation option, but also records a second input such as the document camera, Solstice or your laptop. This makes it possible to switch between different aspects of teaching without having to change the inputs. This is only available in rooms with 2 projectors.

    The final recording may look like this:

    Presentation on the right and document camera on the left

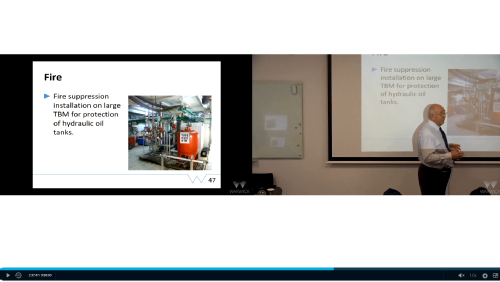
    Record 1 screen, video and audio of presenter [Presentation | Video]

    This is similar to the presentation option, but also records the room camera to record a video of you as you present, which appears alongside your presentation in the recording. This mode is only available if a camera has been installed in the room.

    The final recording may look like this:

    Presentation and capture of presenter

    In order to capture video, you must enable camera control in the room at the start of the lecture and turn it off at the end.

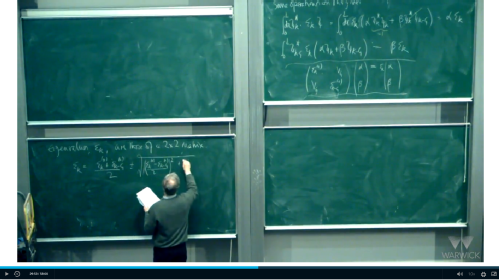
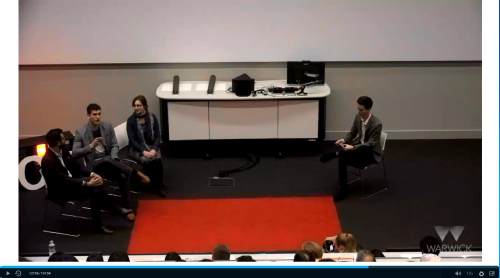
    Record video and audio of presenter [Video only]

    This option records the feed from the in-room camera and, depending on the presets available, enables you to zoom into the presenter area or to record the chalk or whiteboard area. This is also useful for panel discussions etc. where presentations do not need to be captured. You must use the radio mic provided to record your commentary. This mode is only available if a camera has been installed in the room.

    The final recording may look like this:

    capture of lecturer writing on black board

    or, it may look like this:

    Capture of panel discussion in lecture

    Record audio of presenter only [Audio only]

    This option records just the audio in the room and can be used for producing podcasts or audio-only webinars.

    Ultimately, the choice of what is recorded is up to you. In smaller rooms, there is no option to change it during the event, but in rooms where there is a touch panel present, you can override the options you have chosen from the list above, switching between inputs on the displays e.g. replacing your presentation with the document visualiser, your own laptop, and enabling the in-room camera if available.

    Find out more in these guides:

    Once your schedule has been created, your session will be recorded automatically.

    If the room for your session changes, you must inform us as soon as possible so that the details can be updated. Location information does not update automatically and your session will not be recorded. In case of an emergency room change, please contact Audio Visual on 024765 22463

    Recording is usually scheduled to begin 1 minute after the scheduled start time and to end 1 minute before the scheduled end time in order to allow for people to enter and leave, and for the recordings to be processed and uploaded. Most rooms are equipped with indicator lights on the lectern to show the recording status.

    What to expect in the rooms

    You may want to familiarise yourself with a room's setup before you teach there.Link opens in a new window This is also useful in terms of booking a lecture capture recording so that you aware of the room capabilities.

    Audio

    To ensure you get the best audio quality when recording your lecture use the in-room wireless microphones. There are two types of microphone and the video below details how to use both types.

    We recommend that you:

    • attach the microphone to the center of your chest on a collar or lapel, avoiding anything that might rub or knock on it.
    • perform a sound-check to ensure everything is working and that your students can hear you.

    In the event that the microphones are not working, most rooms are equipped with a microphone on the lectern which will pick up your voice albeit at a lower quality and volume than the lapel microphones. Please note that microphones in the room will pick up student questions and other audio.

    Lecture Capture indicator lights

    Lecture Capture Indicator Lights have been installed on the lecterns in many rooms. These lights signal the status of the recording:

    • Amber - About to record: This light will glow amber 3 minutes before the recording is about to start.
    • Red - Recording: The light will turn red when you are recording.
    • Red/Amber - Error: If the light starts flashing red and amber, no audio has been detected. Please check your microphone is turned on.

    AV touch panel

    Many rooms are equipped with a touch panel that will let you change the inputs for lecture capture during the session. Lecture capture allows up to 2 inputs in most rooms so you will need to change the inputs if you are switching from showing your presentation and using the visualiser, to showing the video feed of the whiteboards, and sharing your laptop screen, for example. For more information on the inputs available, please see the rooms information on the Audio Visual website.

    To enable the in-room camera to capture video of the presenter or whiteboards/blackboards, you must ensure camera control is turned on via the touch panel. Follow the guidance at use a lecture capture camera.

    Echo can capture two inputs at any one time for example:
    • One of PC, Laptop, Document Camera or Solstice, and the camera to capture video of the presenter or whiteboards/blackboards.
    • Alternatively, PC/Laptop and the Document Camera.
    It is not possible to capture the PC/Laptop and Document Camera and video of the Presenter / white or chalk board simultaneously as this would be a total of three inputs.

    Pause a recording

    If you need to pause the recording to remove a gap in the presentation, have a private discussion, discuss sensitive topics or to invite student questions that should not be recorded, this can be done via the AV touch panel.

    1. Tap the flashing Rec button found on the top left of the touch panel, this will open the recording details.
    2. Tap the Pause Capture button, found at the bottom of the recording details.
    3. You must resume recording by tapping the Resume Capture button which will have replaced the Pause Capture option found in the recording details. If you do not, then the remainder of the lecture will not be recorded.
    Recordings can be edited after completion to remove any sections that are not required.
    For information on recording lectures from home, or outside Lecture Capture-enabled spaces, see our guidance on Echo360 Universal Capture.

    If you need help whilst in a teaching space, contact AV services:

    024765 22463

    audio dot visual at warwick dot ac dot uk

    warwick.ac.uk/av

    For all other enquiries, please contact lecturecapture at warwick dot ac dot uk

    The information on this page relates to Echo360 Lecture Capture and was last updated March 2021.

    Contents

    Filter by tool, task or content